<?xml version="1.0" encoding="utf-8"?><feed xmlns="http://www.w3.org/2005/Atom" ><generator uri="https://jekyllrb.com/" version="3.10.0">Jekyll</generator><link href="https://jaceho.github.io/feed.xml" rel="self" type="application/atom+xml" /><link href="https://jaceho.github.io/" rel="alternate" type="text/html" /><updated>2026-11-05T10:03:09+00:00</updated><id>https://jaceho.github.io/feed.xml</id><title type="html">Fake it until you make it.</title><entry><title type="html">分析预测模型在机器学习中的应用之线性回归</title><link href="https://jaceho.github.io/machine-learning-regress/" rel="alternate" type="text/html" title="分析预测模型在机器学习中的应用之线性回归" /><published>2016-06-28T00:00:00+00:00</published><updated>2016-06-28T00:00:00+00:00</updated><id>https://jaceho.github.io/machine-learning-regress</id><content type="html" xml:base="https://jaceho.github.io/machine-learning-regress/"><![CDATA[<p>回归能做什么呢？《机器学习实战》的作者认为：</p>
<blockquote>
  <p>回归能做任何事情。</p>
</blockquote>

<p>回归模型大致分为2个阶段，训练阶段和预测阶段， 训练阶段需要对历史确定结果的数据进行反馈训练，使得模型的参数适应当前的输入与预期输出， 预测阶段在完善模型的基础上对新的数据进行模拟输出。这两个阶段对于一个模型都至关重要。</p>

<p>回归模型广泛地应用于机器学习，深度学习，AI，人工智能等领域，在这里我们讲对它的应用进行
深入浅出的学习与探讨。</p>

<p>针对不同的数据(数值型和标称型)，我们一般有两种预测倾向，数值预测，类别预测，这两种预测有某种潜在的关系，可以说，分类是高层次及符合条件下的数量预测，它建立在数量预测的基础上(这个后面的章节会cover到)</p>

<p>这篇文章的研究环境，基于<a href="https://github.com/jupyter/notebook"><code class="language-plaintext highlighter-rouge">jupiter notebook</code></a>， 依赖的python包有<a href=""><code class="language-plaintext highlighter-rouge">pydataset</code></a>,<a href="http://scikit-learn.org/"> <code class="language-plaintext highlighter-rouge">scilearn</code></a>,
 <a href="http://pandas.pydata.org/"> <code class="language-plaintext highlighter-rouge">pandas</code></a>, <a href="https://github.com/mwaskom/seaborn"><code class="language-plaintext highlighter-rouge">seaborn</code></a>以及必要的<code class="language-plaintext highlighter-rouge">线性代数</code>，<code class="language-plaintext highlighter-rouge">统计学</code>及<code class="language-plaintext highlighter-rouge">高等数学</code>的知识。
[TOC]</p>

<h3 id="线性回归模型">线性回归模型</h3>
<p>这是最简单的回归模型，也是最general的机器学习算法，也包含了机器学习与回归模型最朴素和使用的思考方法，  它基于一个朴素的假设：输入和输出之间存在简单的线性关系.
\(y = h(\mathbf{x}) = \theta_0 + \theta_1*x_1 + \theta_2*x_1 +  ...\theta_n*x_n = \mathbf{\theta}^T\mathbf{x}\)
其中y 是输出的数值,$x_i$ 是输入的数值,x_0 =1,  n是输入的特征数量
\(\mathbf{x}=[x_0,x_1...x_n]^T\) 
\(\mathbf{\theta}=[\theta_0,\theta_1...\theta_n]\)</p>

<p>线性回归算法需要确定$\theta_j$使得平方误差的和最小, 构造损失函数:
\(J(\theta)={1 \over 2}\sum_{i=1}^{m}(h_\theta(x^{(i)})-y^{(i)})^2\)
这里简单地给出选用误差函数为平方和的概率证明
首先我们提出了一个符合常理的假设：误差是服从均值为0，的高斯分布 的
\(y^{(i)}=\theta^Tx^{(i)}+\epsilon^{(i)}\)
即
\(\epsilon^{(i)} = y^{(i)}-\theta^Tx^{(i)}  \sim  N(0, \sigma^2)\)
最大似然估计
\(max { \prod_{i=1}^{m}p(y^{(i)}|x^{(i)}; \theta) }  = max{ \prod_{i=1}^{m}} {1 \over {\sqrt{2\pi}\sigma}} e^{- { { ({y^{(i)} - \theta^T x^{(i)} })^2 } \over 2\sigma^2}}\)
\(max\,{ log( \prod_{i=1}^{m}p(y^{(i)}|x^{(i)}; \theta) ) } =  max\,{mlog({1 \over {\sqrt{2\pi}\sigma}}) - {1 \over 2\sigma^2}\sum_{i=1}^{m}(h_\theta(x^{(i)})-y^{(i)})^2}\)
\(\Rightarrow  min\,{1 \over 2}\sum_{i=1}^{m}(h_\theta(x^{(i)})-y^{(i)})^2 = min\,{J(\theta)}\)</p>
<h4 id="最小二乘法">最小二乘法</h4>
<p>对$\mathbf{\theta}$求导得到:
\(J'(\theta)=X^T(Y-X\theta)=0\)
\(\Rightarrow \theta = (X^TX)^{-1}X^TY\)</p>
<h4 id="梯度下降法">梯度下降法</h4>
<p>选定learning rate  $\alpha$,对 $\mathbf{\theta}$ 的每个分量求偏导去更新$\theta_j$:
\(tmp_j=\theta_j-\alpha*{\partial \over \partial\theta_j}J(\theta)\) 
其中
\(\mathbf{\theta} = [tmp_0, tmp_1...tmp_n]^T\)
\({\partial \over \partial\theta_j}J(\theta)={\partial \over \partial\theta_j}{1 \over 2m}\sum_{i=1}^{m}(\theta_0x_0^{(i)}+...\theta_nx_n^{(i)} - y^{(i)})^2\)
\(\Rightarrow {\partial \over \partial\theta_j}J(\theta)={\partial \over \partial\theta_j}{1 \over m}\sum_{i=1}^{m}((h_\theta(x^{(i)}) - y^{(i)})x^{(i)}\)
对于n=1时，$y=mx+b$, python梯度下降代码如下：</p>
<div class="language-python highlighter-rouge"><div class="highlight"><pre class="highlight"><code><span class="k">def</span> <span class="nf">stepGradient</span><span class="p">(</span><span class="n">b_current</span><span class="p">,</span> <span class="n">m_current</span><span class="p">,</span> <span class="n">points</span><span class="p">,</span> <span class="n">learningRate</span><span class="p">):</span>
    <span class="n">b_gradient</span> <span class="o">=</span> <span class="mi">0</span>
    <span class="n">m_gradient</span> <span class="o">=</span> <span class="mi">0</span>
    <span class="n">N</span> <span class="o">=</span> <span class="nb">float</span><span class="p">(</span><span class="nb">len</span><span class="p">(</span><span class="n">points</span><span class="p">))</span>
    <span class="k">for</span> <span class="n">i</span> <span class="ow">in</span> <span class="nb">range</span><span class="p">(</span><span class="mi">0</span><span class="p">,</span> <span class="nb">len</span><span class="p">(</span><span class="n">points</span><span class="p">)):</span>
        <span class="n">b_gradient</span> <span class="o">+=</span> <span class="o">-</span><span class="p">(</span><span class="mi">2</span><span class="o">/</span><span class="n">N</span><span class="p">)</span> <span class="o">*</span> <span class="p">(</span><span class="n">points</span><span class="p">[</span><span class="n">i</span><span class="p">].</span><span class="n">y</span> <span class="o">-</span> <span class="p">((</span><span class="n">m_current</span><span class="o">*</span><span class="n">points</span><span class="p">[</span><span class="n">i</span><span class="p">].</span><span class="n">x</span><span class="p">)</span> <span class="o">+</span> <span class="n">b_current</span><span class="p">))</span>
        <span class="n">m_gradient</span> <span class="o">+=</span> <span class="o">-</span><span class="p">(</span><span class="mi">2</span><span class="o">/</span><span class="n">N</span><span class="p">)</span> <span class="o">*</span> <span class="n">points</span><span class="p">[</span><span class="n">i</span><span class="p">].</span><span class="n">x</span> <span class="o">*</span> <span class="p">(</span><span class="n">points</span><span class="p">[</span><span class="n">i</span><span class="p">].</span><span class="n">y</span> <span class="o">-</span> <span class="p">((</span><span class="n">m_current</span> <span class="o">*</span> <span class="n">points</span><span class="p">[</span><span class="n">i</span><span class="p">].</span><span class="n">x</span><span class="p">)</span> <span class="o">+</span> <span class="n">b_current</span><span class="p">))</span>
    <span class="n">new_b</span> <span class="o">=</span> <span class="n">b_current</span> <span class="o">-</span> <span class="p">(</span><span class="n">learningRate</span> <span class="o">*</span> <span class="n">b_gradient</span><span class="p">)</span>
    <span class="n">new_m</span> <span class="o">=</span> <span class="n">m_current</span> <span class="o">-</span> <span class="p">(</span><span class="n">learningRate</span> <span class="o">*</span> <span class="n">m_gradient</span><span class="p">)</span>
    <span class="k">return</span> <span class="p">[</span><span class="n">new_b</span><span class="p">,</span> <span class="n">new_m</span><span class="p">]</span>
</code></pre></div></div>
<p>重复执行<code class="language-plaintext highlighter-rouge">stepGradient</code>后得到$J(\theta)$与执行次数的关系:</p>

<p>下面是sklearn的线性模型的应用:</p>
<div class="language-python highlighter-rouge"><div class="highlight"><pre class="highlight"><code><span class="kn">from</span> <span class="nn">sklearn</span> <span class="kn">import</span> <span class="n">datasets</span>
<span class="kn">from</span> <span class="nn">sklearn.cross_validation</span> <span class="kn">import</span> <span class="n">cross_val_predict</span>
<span class="kn">from</span> <span class="nn">sklearn</span> <span class="kn">import</span> <span class="n">linear_model</span>
<span class="kn">import</span> <span class="nn">matplotlib.pyplot</span> <span class="k">as</span> <span class="n">plt</span>

<span class="n">lr</span> <span class="o">=</span> <span class="n">linear_model</span><span class="p">.</span><span class="n">LinearRegression</span><span class="p">()</span>
<span class="n">boston</span> <span class="o">=</span> <span class="n">datasets</span><span class="p">.</span><span class="n">load_boston</span><span class="p">()</span>
<span class="n">y</span> <span class="o">=</span> <span class="n">boston</span><span class="p">.</span><span class="n">target</span>

<span class="c1"># cross_val_predict returns an array of the same size as `y` where each entry
# is a prediction obtained by cross validated:
</span><span class="n">predicted</span> <span class="o">=</span> <span class="n">cross_val_predict</span><span class="p">(</span><span class="n">lr</span><span class="p">,</span> <span class="n">boston</span><span class="p">.</span><span class="n">data</span><span class="p">,</span> <span class="n">y</span><span class="p">,</span> <span class="n">cv</span><span class="o">=</span><span class="mi">10</span><span class="p">)</span>

<span class="n">fig</span><span class="p">,</span> <span class="n">ax</span> <span class="o">=</span> <span class="n">plt</span><span class="p">.</span><span class="n">subplots</span><span class="p">()</span>
<span class="n">ax</span><span class="p">.</span><span class="n">scatter</span><span class="p">(</span><span class="n">y</span><span class="p">,</span> <span class="n">predicted</span><span class="p">)</span>
<span class="n">ax</span><span class="p">.</span><span class="n">plot</span><span class="p">([</span><span class="n">y</span><span class="p">.</span><span class="nb">min</span><span class="p">(),</span> <span class="n">y</span><span class="p">.</span><span class="nb">max</span><span class="p">()],</span> <span class="p">[</span><span class="n">y</span><span class="p">.</span><span class="nb">min</span><span class="p">(),</span> <span class="n">y</span><span class="p">.</span><span class="nb">max</span><span class="p">()],</span> <span class="s">'k--'</span><span class="p">,</span> <span class="n">lw</span><span class="o">=</span><span class="mi">4</span><span class="p">)</span>
<span class="n">ax</span><span class="p">.</span><span class="n">set_xlabel</span><span class="p">(</span><span class="s">'Measured'</span><span class="p">)</span>
<span class="n">ax</span><span class="p">.</span><span class="n">set_ylabel</span><span class="p">(</span><span class="s">'Predicted'</span><span class="p">)</span>
<span class="n">plt</span><span class="p">.</span><span class="n">show</span><span class="p">()</span>
</code></pre></div></div>
<h4 id="回归的正则化与特征选择">回归的正则化与特征选择</h4>
<p>为了避免过拟合的问题，使模型更general一些，正则化的理念被提了出来，正则化被用来减小单个$\theta_j$的影响,基本原理是在全局损失函数中加入惩罚函数</p>
<h5 id="elastic-net方法">Elastic net方法</h5>
<p>L1(曼哈顿距离)正则化,也叫Ridge regression， 它将$sum_{i=0}^{n}|\theta_i|$ 作为惩罚函数, 它保留一个$\theta_j$而使其他的应变量趋向于0
L2(欧几里得距离)正则化,也叫Lasso regression，它将$sum_{i=0}^{n}|\theta_i|^2$作为惩罚函数, 它使得所有的$\theta_j$依存变量拥有相同的影响</p>

<p>将两者结合后亦即elastic net惩罚，我们的损失函数就成了:
\(J(\theta)={1 \over 2}\sum_{i=1}^{m}(h_\theta(x^{(i)})-y^{(i)})^2 + \lambda({\alpha}sum_{j=0}^{n}|\theta_j|  +  (1-\alpha)sum_{j=1}^{n}|\theta_j|^2)\)
可以看出,$\alpha$是我们对于L1和L2正则化的偏向，$\lambda$代表正则化的程度,然后使用前面提到的正规方程或者梯度下降来求解, 求得正则化后的$\theta_j$</p>

<p>令$\lambda_1=\lambda\alpha$, $\lambda_2=\lambda(1-\alpha)$, 对于给定的数据(X,Y),  $\lambda$,$\alpha$ 定义一个数据集$(X^*, Y^*)$.</p>

\[X_{(n+p)*p}=(1+\lambda)^{1/2}{\begin{pmatrix} X\\ \sqrt{(\lambda_2I) }\\\end{pmatrix}}\]

<p>\({Y_{n+p}}^*=\begin{pmatrix} Y \\ 0 \\ \end{pmatrix}\)
令$\gamma=\lambda_1/\sqrt{(1+\lambda_2)}, \beta^*=\sqrt{(1+\lambda_2)}\beta$, 则：
\(||Y-X\theta||^2+\lambda_2\,sum_{j=1}^{p}\theta_j^2+\lambda_1\,sum_{j=1}^{p}|\theta_j|
=||Y^*-X^*\theta^*||^2+\gamma\,sum_{j=1}^{p}|\theta_j^*|\)
\(\Rightarrow \hat \theta_{(Elastic Net)}={1 \over \sqrt{(1+\lambda_2)}}{\hat \theta^*} = {1 \over \sqrt{(1+\lambda_2)}} arg min{||Y^*-X^*\theta^*||^2 + \gamma\,sum_{j=1}^{p}{|\theta_j^*|}}\)
这便转化为了普通的<a href="https://en.wikipedia.org/wiki/Lasso_(statistics)">套索问题</a></p>

<p>参考：
<a href="http://baike.baidu.com/link?url=akO9Z0DPatdoeDUDYgia2IvbG6MVCJUiqAbHuZmXH16n7sHjjPGngKg1ozrSh3T0kTX_wEgNmiqEwNwD98_kUa#5">似然函数</a>
<a href="http://baike.baidu.com/link?url=BOZMFNcZdLep-ywZnl34ClJ_TWFjiVqYRgKP_Es3UMhldA0H0bB8sDuhvFbGyKQ7ISnQDA2DiJzxadC_AHcJ6_">最小二乘法</a>
<a href="http://www.cnblogs.com/huashiyiqike/p/3568922.html">矩阵，向量求导</a>
<a href="http://baike.baidu.com/link?url=Og7CzUF8qUOEmj3avrXXGbB5Tr9kRGiX3u-Z5USycG8DaIofrYILswcePnYfZGY42tm-5yUSuE6OfDUEhFo7Fq">极大似然估计</a>
<a href="http://www.doc88.com/p-0953739664306.html">广义线性模型基于Elastic+Net的变量选择方法研究</a></p>]]></content><author><name></name></author><category term="线性回归" /><category term="machine learning" /><category term="regression" /><category term="algorithms" /><summary type="html"><![CDATA[回归能做任何事情]]></summary></entry><entry><title type="html">android中的线程与进程模型</title><link href="https://jaceho.github.io/android-thread-process/" rel="alternate" type="text/html" title="android中的线程与进程模型" /><published>2016-06-15T00:00:00+00:00</published><updated>2016-06-15T00:00:00+00:00</updated><id>https://jaceho.github.io/android-thread-process</id><content type="html" xml:base="https://jaceho.github.io/android-thread-process/"><![CDATA[<blockquote>
  <p>了解Android的多线程与多进程模型有助于我们对Android app的整个开发模型有更深的理解,这里记录下一些理解与思考.</p>
</blockquote>

<h3 id="android中的线程">Android中的线程</h3>
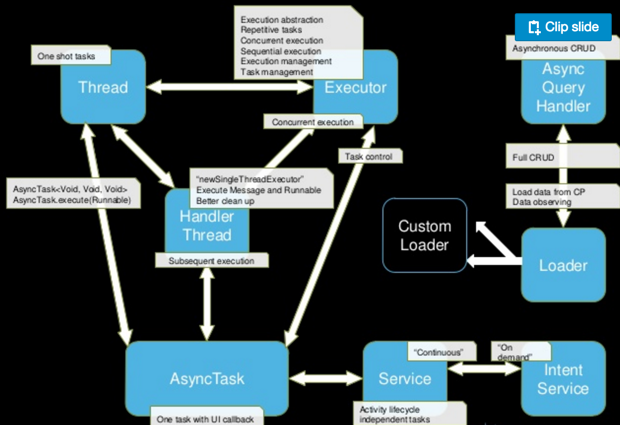
<p>对于初学java的人都知道<code class="language-plaintext highlighter-rouge">thread</code>的概念，而到了android thread的概念变味了，出现了譬如service, asynctask, intent service, handler thread, async query loader, threadpool executor等纷繁复杂的概念， android对于线程的处理机制如下。</p>

<ul>
  <li>主线程
    <ul>
      <li>所有Android基础组件均在<strong>指定进程的主线程中初始化</strong></li>
      <li>所有系统对于基础组件的回调事件均在主线程中<strong>分发</strong>
        <ul>
          <li>组件中的系统回调方法在指定进程的主线程中执行</li>
          <li>所有的基础组件不应该在系统回调代码中执行耗时操作</li>
        </ul>
      </li>
      <li>所有不能立即完成的操作都应该被放在非UI线程中执行
        <ul>
          <li>线程对象使用标准的java代码来创建</li>
        </ul>
      </li>
      <li>Android提供一些方便的类来管理线程:
        <ul>
          <li>Looper作为<code class="language-plaintext highlighter-rouge">ThreadLocal</code>的单例变量用来循环处理消息队列(<code class="language-plaintext highlighter-rouge">MessageQueue</code>)</li>
          <li>Handler提供消息/Runable的发送以及回调操作</li>
          <li>HandlerThread提供启动拥有Looper线程的简易方法</li>
        </ul>
      </li>
    </ul>
  </li>
</ul>

<p>针对不同的使用场景，在线程，线程池，handler等基础上我们拓展了一些易用的线程处理组件：
<img src="https://jaceho.github.io/assets/img/928566-c40e4e439581e563.png?imageMogr2/auto-orient/strip%7CimageView2/2/w/1240" alt="android_multitasking.png" /></p>

<h3 id="android-中的进程">Android 中的进程</h3>

<ul>
  <li>当应用的第一个组件需要被执行时，Android Framework会为此启动一个有单线程(主线程,即UI线程)运行环境的Linux进程</li>
  <li>当Android系统资源紧缺时会终止一些进程的执行</li>
  <li>对于特定的Android组件<activity> <service> <receiver> <provider>，我们可以通过android:process来指定
 它运行的进程
</provider></receiver></service></activity>    <ul>
      <li>每个组件可以运行在它所指定的进程中</li>
      <li>一些组件会共享一个进程， 而其他的不在其中</li>
      <li>不同application中的组件可以在同一个进程中执行</li>
    </ul>
  </li>
  <li>我们可以通过设置<application>的process属性指定应用所有组件的默认运行进程</application></li>
</ul>

<h4 id="android中的rpc">Android中的rpc</h4>
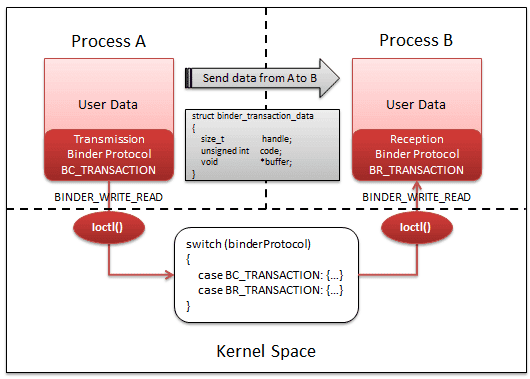
<p>Android进程间通讯实际上可以看做2个进程中的线程消息传递，作为cs架构，其实现依赖binder机制</p>
<h5 id="binder机制解析">binder机制解析:</h5>

<p><img src="https://jaceho.github.io/assets/img/928566-0f3b05068e7e3243.png?imageMogr2/auto-orient/strip%7CimageView2/2/w/1240" alt="Paste_Image.png" /></p>

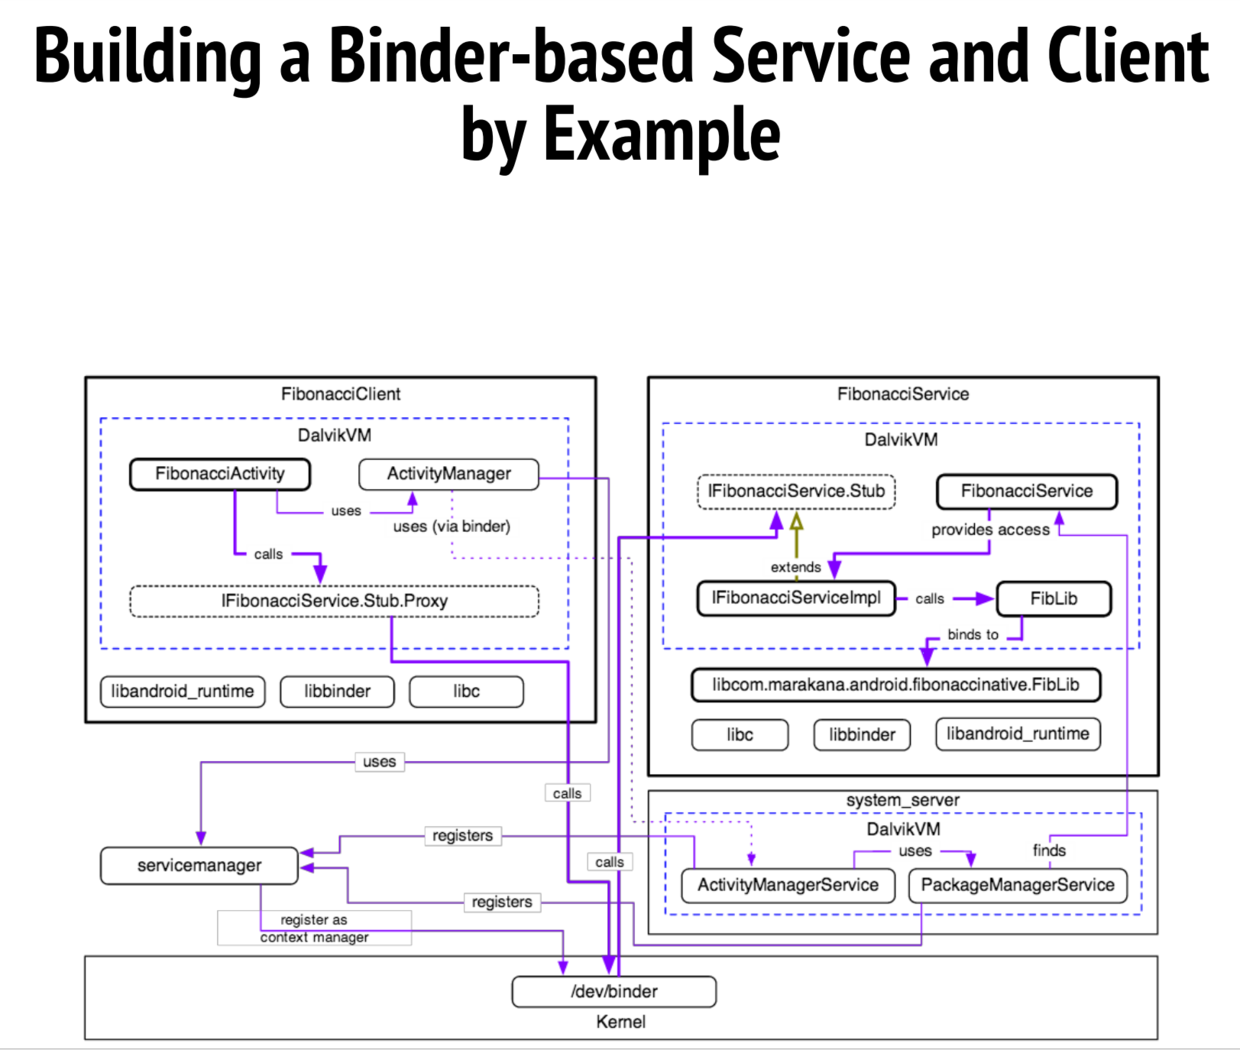
<h5 id="分层示例">分层示例</h5>
<p><img src="https://jaceho.github.io/assets/img/928566-fe9808d43e9b6400.png?imageMogr2/auto-orient/strip%7CimageView2/2/w/1240" alt="实例分析" /></p>
<h5 id="进程间通讯binder机制clientserver实现代码示例">进程间通讯binder机制client,server实现代码示例：</h5>
<div class="language-shell highlighter-rouge"><div class="highlight"><pre class="highlight"><code>git clone https://github.com/marakana/FibonacciBinderDemo.git
</code></pre></div></div>
<p>参考链接：
<a href="http://events.linuxfoundation.org/images/stories/slides/abs2013_gargentas.pdf">http://events.linuxfoundation.org/images/stories/slides/abs2013_gargentas.pdf</a>
<a href="http://www.cubrid.org/blog/dev-platform/binder-communication-mechanism-of-android-processes/">http://www.cubrid.org/blog/dev-platform/binder-communication-mechanism-of-android-processes/</a></p>]]></content><author><name></name></author><category term="线程" /><category term="进程模型" /><category term="android" /><category term="内存" /><summary type="html"><![CDATA[了解Android的多线程与多进程模型有助于我们对Android app的整个开发模型有更深的理解]]></summary></entry><entry><title type="html">android内存优化之图片加载</title><link href="https://jaceho.github.io/android-image/" rel="alternate" type="text/html" title="android内存优化之图片加载" /><published>2016-06-11T00:00:00+00:00</published><updated>2016-06-11T00:00:00+00:00</updated><id>https://jaceho.github.io/android-image</id><content type="html" xml:base="https://jaceho.github.io/android-image/"><![CDATA[<h4 id="app图标的现有问题">APP图标的现有问题</h4>
<p>因为我们应用中大量常用view中出现图标概率很大，正常使用拉取图标较多，对图标的流量问题优化的投入产出比会很高,对于图片的选择和使用就尤为重要。 
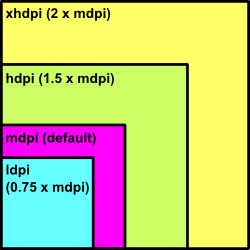
android分段屏幕的物理尺寸如下:</p>

<p><img src="https://jaceho.github.io/assets/img/928566-f5427c984a4ea787.png?imageMogr2/auto-orient/strip%7CimageView2/2/w/1240" alt="xdpi" /></p>

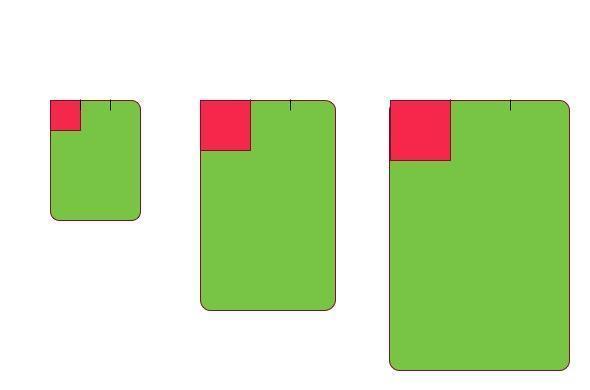
<p>现在有三个物理长宽分别为2寸、3寸, 4 寸，
屏幕密度分别为120dpi、160dpi、240dpi的手机
在这三个屏幕上，将三个手机屏幕的宽分为三等份，则根据dpi的定义，
三个屏幕中每等份分别容纳80px, 160px, 320px
若只有drawable下的图片：则所以在hdpi屏幕上系统会按比例将drawable下的图片扩
大为原来的1.5倍，在ldpi屏幕上系统会按比例将drawable下的图片缩小为原来的0.75倍</p>

<p><img src="https://jaceho.github.io/assets/img/928566-852eb62c33b7c57d.jpg?imageMogr2/auto-orient/strip%7CimageView2/2/w/1240" alt="" /></p>

<h4 id="android-中的图片预处理">Android 中的图片预处理</h4>
<ul>
  <li>对于图标的处理:
*drable-xdpi:
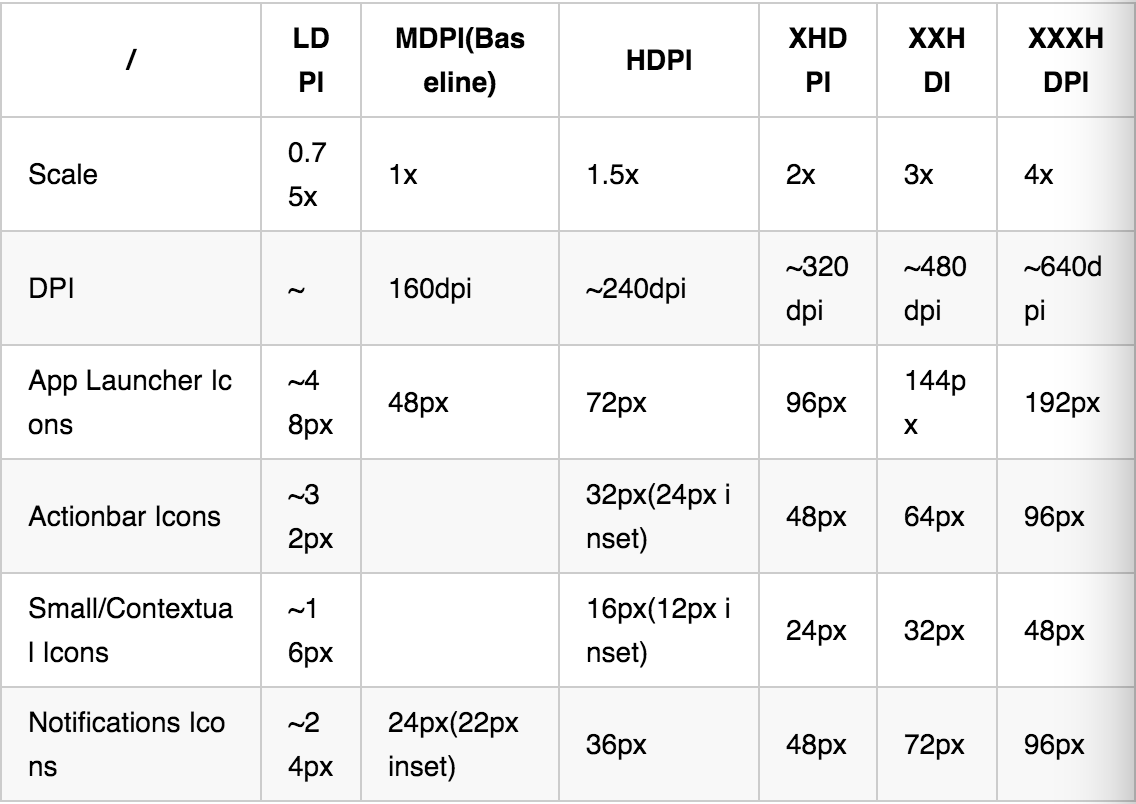
Android中对于drawable的定义比较规整，为了更好的适应各种屏幕，我们选择了几种或全部适配范围，其图片大小和像素大小对应关系如下：</li>
</ul>

<p><img src="https://jaceho.github.io/assets/img/928566-75c1fcc5680cac1f.png?imageMogr2/auto-orient/strip%7CimageView2/2/w/1240" alt="" /></p>

<h4 id="android-寻找icon的过程">Android 寻找icon的过程</h4>
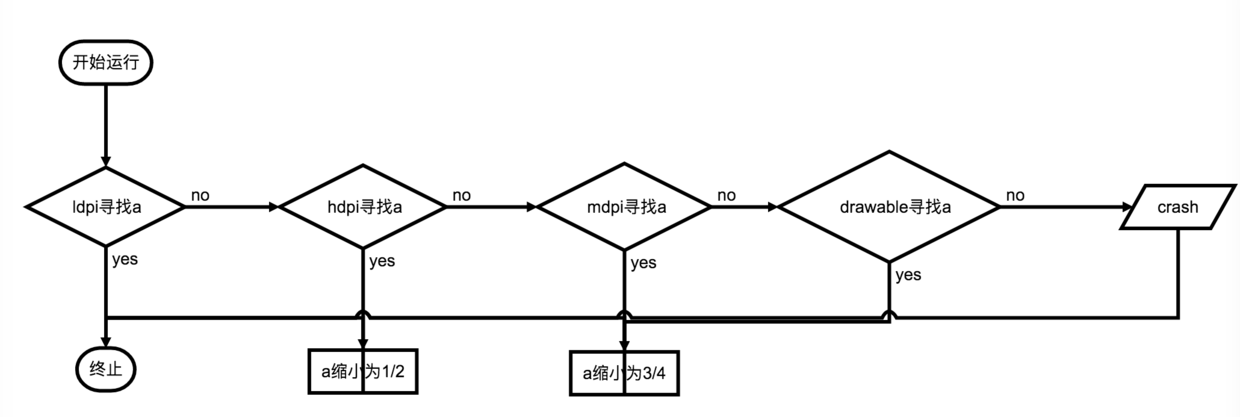
<p>在Android2.1以及之后，出现了drawable-ldpi、drawable-mdpi、
drawable-hdpi、drawable-xhdpi、drawable-xxhdpi。在这些文件
下提供的图片大小最好是3:4:6:8:12。程序在不同的屏幕密度下运行时，会
首先去符合当前屏幕密度的文件夹下找对应的资源，如果没有，系统会以最省力为
前提去别的文件夹下找对应的资源并对其进行相应的缩放，如果还没有，就回去默
认的drawable文件夹下找，然后按照Android2.1之前的规则缩放。如果还没有找到，
应用就会报错或者直接crash掉了。</p>

<p><img src="https://jaceho.github.io/assets/img/928566-dc82f9534b45f79b.png?imageMogr2/auto-orient/strip%7CimageView2/2/w/1240" alt="" /></p>

<h4 id="android中图片的加载">Android中图片的加载</h4>
<p>*对于bitmap的加载</p>
<blockquote>
  <p>On Android2.3.2(API level 10) and lower, the backing pixel data for a bitmap is stored in native memory. It is separate from the bitmap itself, which is stored in the Dalvik heap. The pixel data in native memory is not released in a predictable manaer, potentially causing an application to briefly exceed its memory limits and crash. *As of Android 3.0 (API level 11), the pixel data is stored on the Dalvik heap along with the associated bitmap.
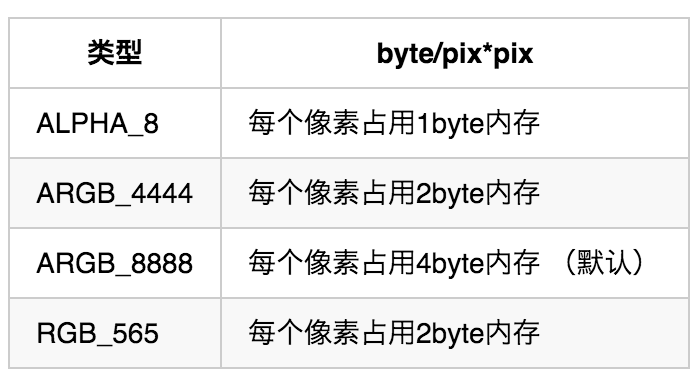
对于bitmap的处理，其canvas的属性有4种，每种占用的内存差别很大
例如在列表中仅用于预览时加载缩略图（thumbnails ）
Android中图片有四种属性，分别是：</p>
</blockquote>

<p><img src="https://jaceho.github.io/assets/img/928566-340c639b4e4e11c9.png?imageMogr2/auto-orient/strip%7CimageView2/2/w/1240" alt="" /></p>

<p>ImageCache 图片缓存，包含内存和Sdcard缓存
典型的图片加载策略: 根据屏幕需要的宽高选择<code class="language-plaintext highlighter-rouge">inSampleSize</code>的值进行decode和load</p>
<ul>
  <li>获取insamplesize
    <div class="language-java highlighter-rouge"><div class="highlight"><pre class="highlight"><code><span class="kd">public</span> <span class="kd">static</span> <span class="kt">int</span> <span class="nf">calculateInSampleSize</span><span class="o">(</span>
<span class="nc">BitmapFactory</span><span class="o">.</span><span class="na">Options</span> <span class="n">options</span><span class="o">,</span> <span class="kt">int</span> <span class="n">reqWidth</span><span class="o">,</span> <span class="kt">int</span> <span class="n">reqHeight</span><span class="o">)</span> <span class="o">{</span>
<span class="c1">// Raw height and width of image</span>
<span class="kd">final</span> <span class="kt">int</span> <span class="n">height</span> <span class="o">=</span> <span class="n">options</span><span class="o">.</span><span class="na">outHeight</span><span class="o">;</span>
<span class="kd">final</span> <span class="kt">int</span> <span class="n">width</span> <span class="o">=</span> <span class="n">options</span><span class="o">.</span><span class="na">outWidth</span><span class="o">;</span>
<span class="kt">int</span> <span class="n">inSampleSize</span> <span class="o">=</span> <span class="mi">1</span><span class="o">;</span>
<span class="k">if</span> <span class="o">(</span><span class="n">height</span> <span class="o">&gt;</span> <span class="n">reqHeight</span> <span class="o">||</span> <span class="n">width</span> <span class="o">&gt;</span> <span class="n">reqWidth</span><span class="o">)</span> <span class="o">{</span>
<span class="kd">final</span> <span class="kt">int</span> <span class="n">halfHeight</span> <span class="o">=</span> <span class="n">height</span> <span class="o">/</span> <span class="mi">2</span><span class="o">;</span>
<span class="kd">final</span> <span class="kt">int</span> <span class="n">halfWidth</span> <span class="o">=</span> <span class="n">width</span> <span class="o">/</span> <span class="mi">2</span><span class="o">;</span>
<span class="c1">// Calculate the largest inSampleSize value that is a power of 2 and keeps both</span>
<span class="c1">// height and width larger than the requested height and width.</span>
<span class="k">while</span> <span class="o">((</span><span class="n">halfHeight</span> <span class="o">/</span> <span class="n">inSampleSize</span><span class="o">)</span> <span class="o">&gt;=</span> <span class="n">reqHeight</span>
<span class="o">&amp;&amp;</span> <span class="o">(</span><span class="n">halfWidth</span> <span class="o">/</span> <span class="n">inSampleSize</span><span class="o">)</span> <span class="o">&gt;=</span> <span class="n">reqWidth</span><span class="o">)</span> <span class="o">{</span>
<span class="n">inSampleSize</span> <span class="o">*=</span> <span class="mi">2</span><span class="o">;</span>
<span class="o">}</span>
<span class="k">return</span> <span class="n">inSampleSize</span><span class="o">;</span>
<span class="o">}</span>
</code></pre></div>    </div>
  </li>
  <li>Decodebitmap
    <div class="language-java highlighter-rouge"><div class="highlight"><pre class="highlight"><code><span class="kd">public</span> <span class="kd">static</span> <span class="nc">Bitmap</span> <span class="nf">decodeSampledBitmapFromResource</span><span class="o">(</span><span class="nc">Resources</span> <span class="n">res</span><span class="o">,</span> <span class="kt">int</span> <span class="n">resId</span><span class="o">,</span>
<span class="kt">int</span> <span class="n">reqWidth</span><span class="o">,</span> <span class="kt">int</span> <span class="n">reqHeight</span><span class="o">)</span> <span class="o">{</span>
<span class="c1">// First decode with inJustDecodeBounds=true to check dimensions</span>
<span class="kd">final</span> <span class="nc">BitmapFactory</span><span class="o">.</span><span class="na">Options</span> <span class="n">options</span> <span class="o">=</span> <span class="k">new</span> <span class="nc">BitmapFactory</span><span class="o">.</span><span class="na">Options</span><span class="o">();</span>
<span class="n">options</span><span class="o">.</span><span class="na">inJustDecodeBounds</span> <span class="o">=</span> <span class="kc">true</span><span class="o">;</span>
<span class="nc">BitmapFactory</span><span class="o">.</span><span class="na">decodeResource</span><span class="o">(</span><span class="n">res</span><span class="o">,</span> <span class="n">resId</span><span class="o">,</span> <span class="n">options</span><span class="o">);</span>
<span class="c1">// Calculate inSampleSize</span>
<span class="n">options</span><span class="o">.</span><span class="na">inSampleSize</span> <span class="o">=</span> <span class="n">calculateInSampleSize</span><span class="o">(</span><span class="n">options</span><span class="o">,</span> <span class="n">reqWidth</span><span class="o">,</span> <span class="n">reqHeight</span><span class="o">);</span>
<span class="c1">// Decode bitmap with inSampleSize set</span>
<span class="n">options</span><span class="o">.</span><span class="na">inJustDecodeBounds</span> <span class="o">=</span> <span class="kc">false</span><span class="o">;</span>
<span class="k">return</span> <span class="nc">BitmapFactory</span><span class="o">.</span><span class="na">decodeResource</span><span class="o">(</span><span class="n">res</span><span class="o">,</span> <span class="n">resId</span><span class="o">,</span> <span class="n">options</span><span class="o">);</span>
<span class="o">}</span>
</code></pre></div>    </div>
    <p>参考链接:
<a href="http://iconhandbook.co.uk/reference/chart/android/">http://iconhandbook.co.uk/reference/chart/android/</a>
<a href="http://mtc.baidu.com/academy/detail/article/105">http://mtc.baidu.com/academy/detail/article/105</a>
<a href="https://developer.android.com/guide/practices/screens_support.html">https://developer.android.com/guide/practices/screens_support.html</a></p>
  </li>
</ul>]]></content><author><name></name></author><category term="图标流量优化" /><category term="android" /><category term="内存" /><summary type="html"><![CDATA[因为我们应用中大量常用view中出现图标概率很大，正常使用拉取图标较多，对图标的流量问题优化的投入产出比会很高。 .]]></summary></entry><entry><title type="html">android内存优化之hprof文件的使用</title><link href="https://jaceho.github.io/android-hprof/" rel="alternate" type="text/html" title="android内存优化之hprof文件的使用" /><published>2016-06-07T00:00:00+00:00</published><updated>2016-06-07T00:00:00+00:00</updated><id>https://jaceho.github.io/android-hprof</id><content type="html" xml:base="https://jaceho.github.io/android-hprof/"><![CDATA[<p>“A small leak will sink a great ship.” - Benjamin Franklin</p>

<p>在android开发中，由于程序员的疏忽，对于android framework处理组件对象的声明周期不够了解，导致了一些内存没有释放。</p>

<p>目前Android上处理处理内存问题的方法均是基于强大的<a href="http://docs.oracle.com/javase/7/docs/technotes/samples/hprof.html">hprof</a>文件的分析，包括<a href="https://developer.android.com/studio/profile/investigate-ram.html">android studio memory dump</a>,  <a href="http://www.jcodecraeer.com/a/anzhuokaifa/androidkaifa/2015/0509/2854.html">leakcanary</a>和<a href="http://www.eclipse.org/mat/downloads.php">eclipse mat</a>(standalone)工具，本文主要针对通用的hporf分析，这也会适用于leakcanry<code class="language-plaintext highlighter-rouge">无法检测</code>的情况.</p>

<p>下面将通过eclipse mat2，adb等工具的配合使用来找到示例工程中内存泄漏所出现问题的地方</p>

<h4 id="内存对象实时监测">内存对象实时监测</h4>
<ul>
  <li>安装mat示例程序后，为了观察内存中各个对象的使用情况，运行一下命令:
    <div class="language-shell highlighter-rouge"><div class="highlight"><pre class="highlight"><code>     <span class="k">while </span><span class="nb">true</span><span class="p">;</span>  <span class="k">do </span>adb shell dumpsys com.example.jefforeilly.mat <span class="p">;</span> <span class="nb">sleep</span> <span class="p">;</span>        
</code></pre></div>    </div>
    <ul>
      <li>打开应用后，内存使用情况
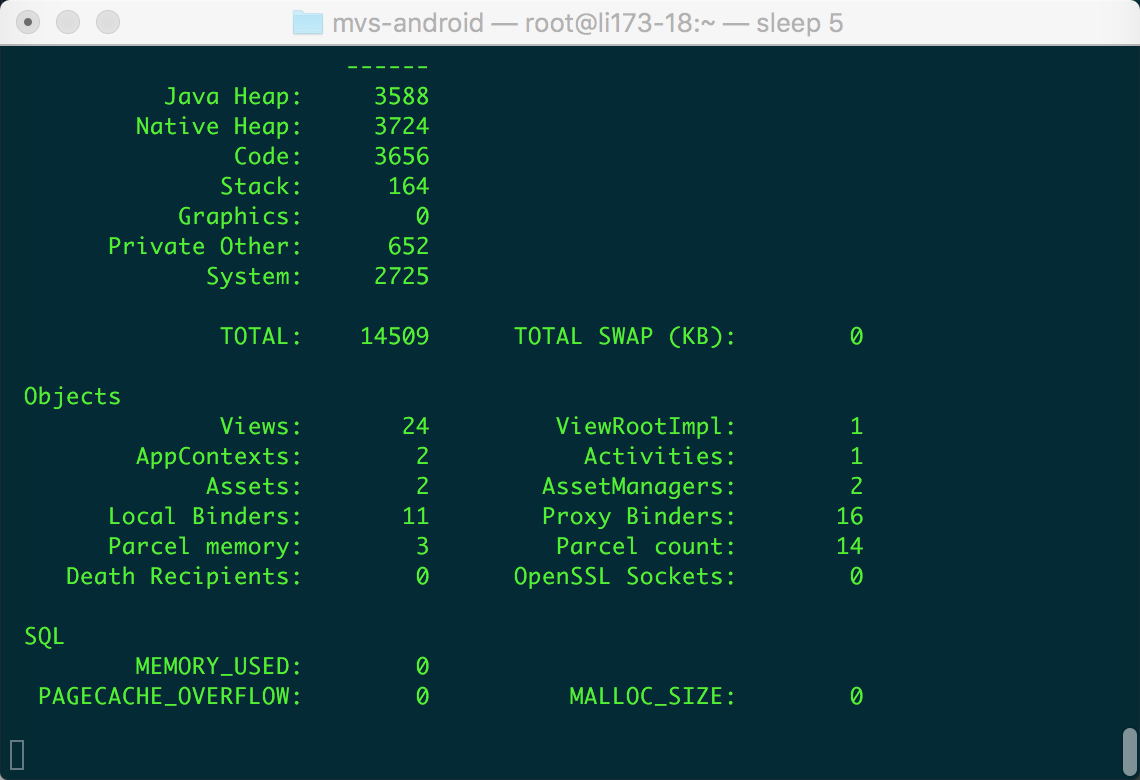
<img src="https://jaceho.github.io/assets/img/928566-0dd4f76cc1cddd0d.png?imageMogr2/auto-orient/strip%7CimageView2/2/w/1240" alt="刚使用时内存使用情况" /></li>
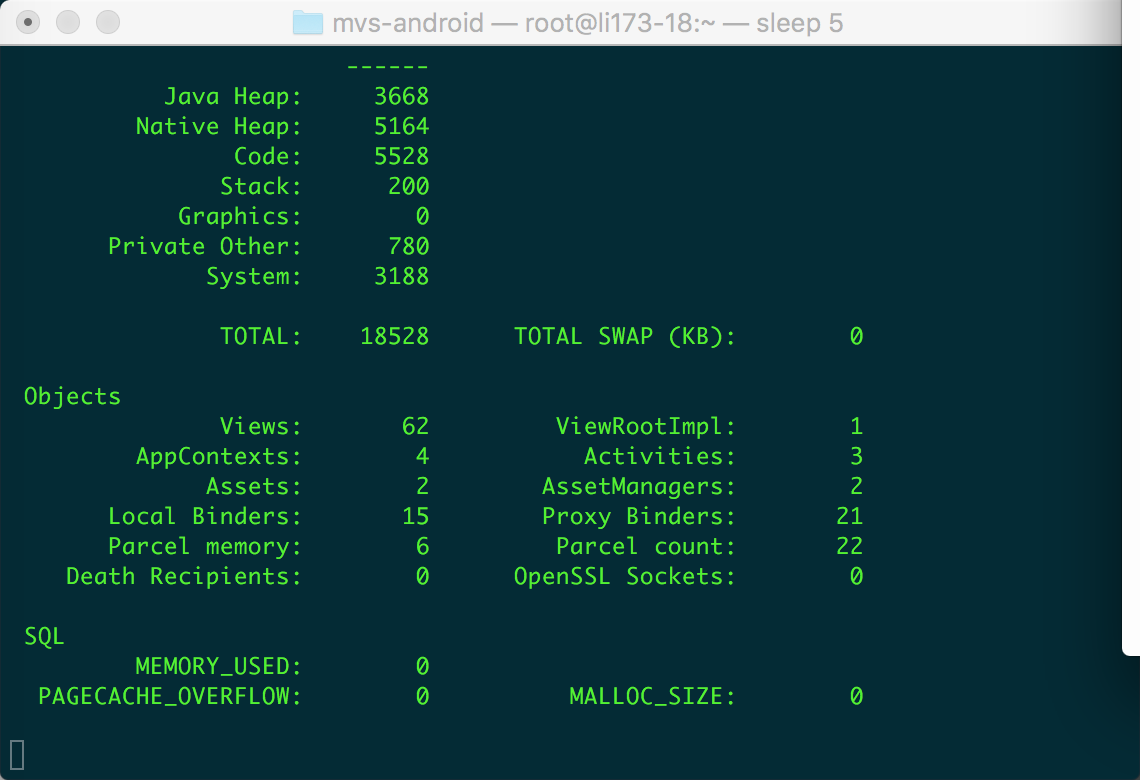
      <li>然后我们正常使用应用（包含2次登录登出，打开主页面，打开fragment，关闭fragment）使用后
<img src="https://jaceho.github.io/assets/img/928566-1af9f4b59d1217a8.png?imageMogr2/auto-orient/strip%7CimageView2/2/w/1240" alt="应用使用后内存使用情况" /></li>
    </ul>
  </li>
</ul>

<h4 id="内存泄漏分析">内存泄漏分析</h4>
<h5 id="android-studio-memory-dump">android studio memory dump</h5>
<ul>
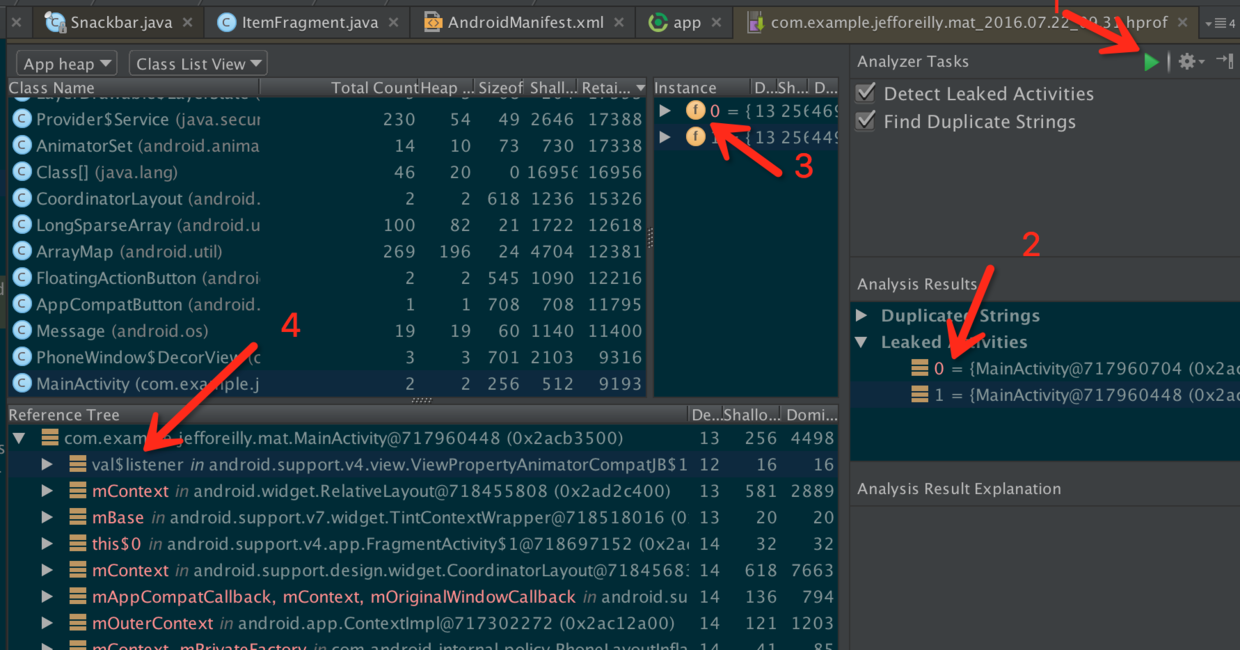
  <li>遇到这种内存泄漏问题，我们可以先用android studio2的memoery dump功能查看reference tree,选择打开<a href="https://developer.android.com/studio/profile/am-memory.html">dominator_tree</a><br />
<img src="https://jaceho.github.io/assets/img/928566-6285d94d0b3aa871.png?imageMogr2/auto-orient/strip%7CimageView2/2/w/1240" alt="C93EE648-089B-449C-9248-A4EAE8D8F2D8.png" />
其中<code class="language-plaintext highlighter-rouge">activity</code>是我们最关心的组件之一，应为它们占用的内存较大，也更容易发现，按图所示步骤，第图中四步，我们发现<code class="language-plaintext highlighter-rouge">viewpropertyanimatorcompat listener</code>没有被释放，这个是我们自己产生的对象，显然有问题。</li>
</ul>

<h5 id="eclipse-mat分析">eclipse mat分析</h5>

<ul>
  <li>不过，大多数情况，我们创建的对象可能更多，他们的ref 深度也超出我们可以随意查找的范围，这就需要使用更加请更加专业的分析工具Eclipse Memory Analyzer了，
在刚才应用的路径<em>Myapplication/captures</em>下 首先转换android hporf 格式
    <div class="language-shell highlighter-rouge"><div class="highlight"><pre class="highlight"><code>     hprof-conv com.example.jefforeilly.myapplication_2016.07.22_09.18.hprof converted.hprof 
</code></pre></div>    </div>
  </li>
  <li>
    <p>转换android vm的hprof格式之后，就可以使用eclipse mat做分析了,</p>

    <ul>
      <li>
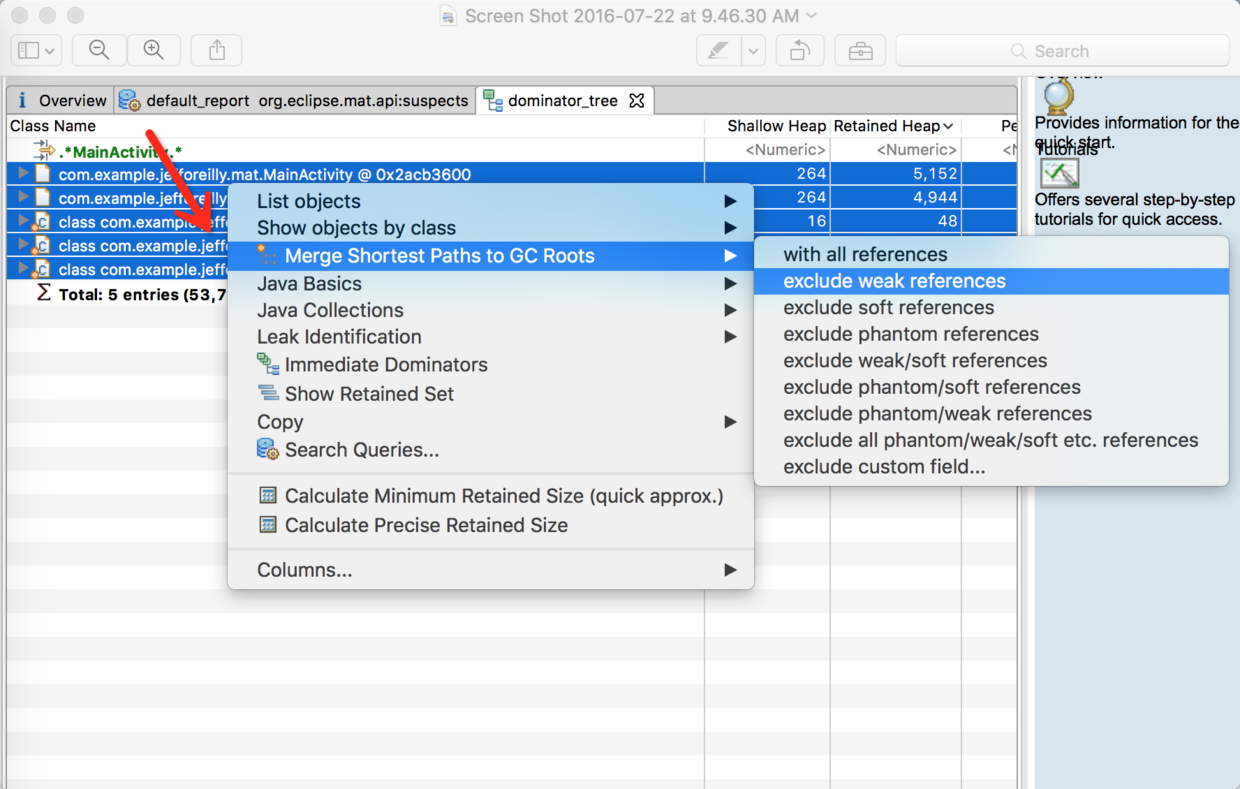
        <p>首先搜索任意我们认为应该被回收的对象名称，如这个例子中的MainActivity, 这里发现了5个入口,  为简单处理，我们全选所有对象， 右键选择 <code class="language-plaintext highlighter-rouge">merge shorttest paths to gc roots</code>(exclude weak references),  得到距离gc root 更近的节点. 
<img src="https://jaceho.github.io/assets/img/928566-4de3962089671d61.png?imageMogr2/auto-orient/strip%7CimageView2/2/w/1240" alt="EA5A3190-E96B-46C2-943C-F43B81EAD47A.png" /></p>
      </li>
      <li>
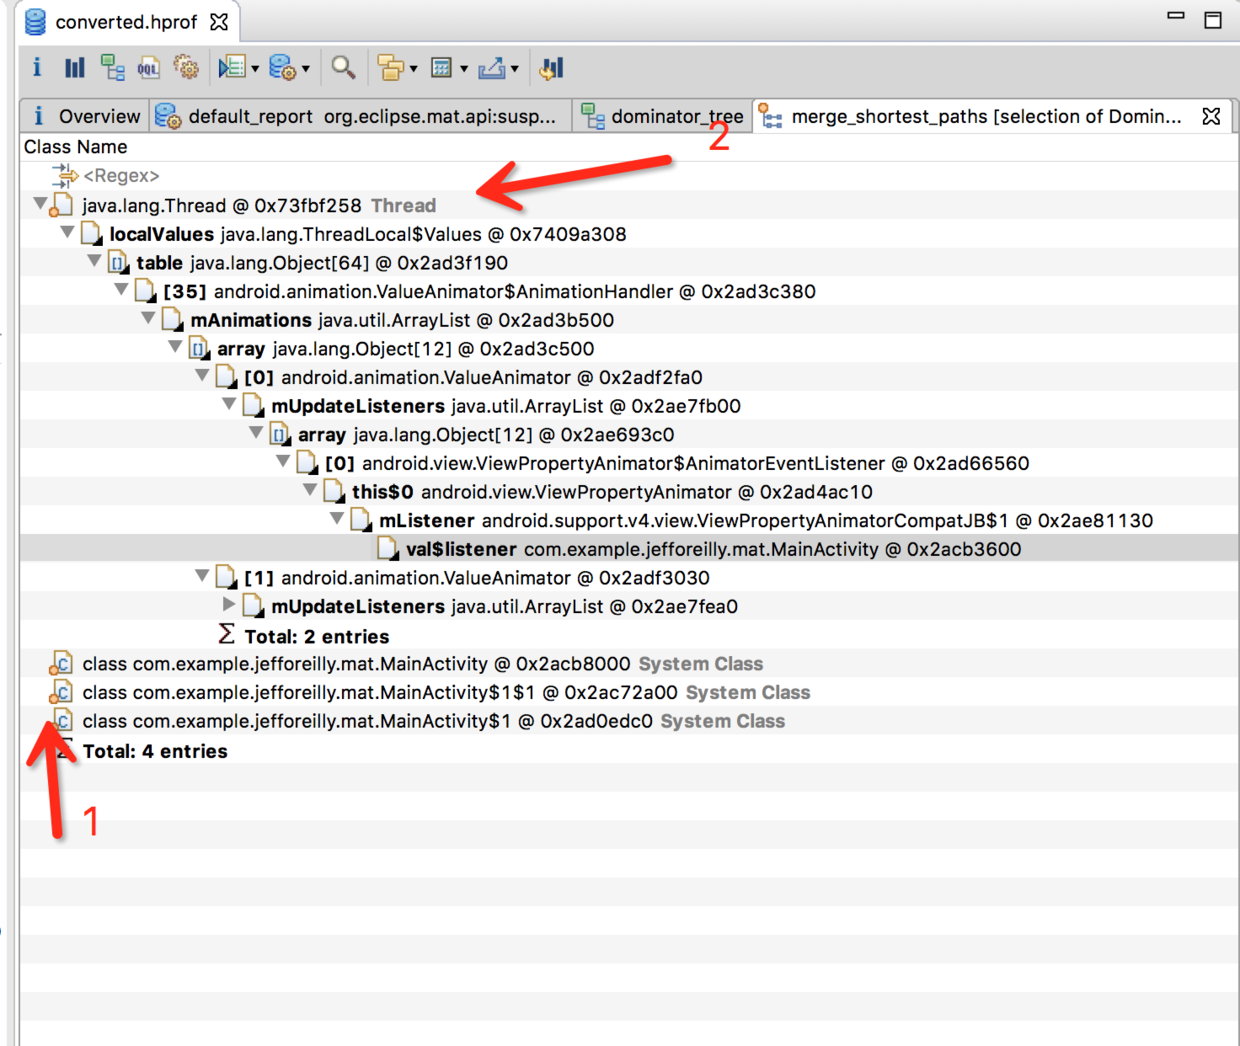
        <p>依次展开这些节点， 发现了当前线程函数栈中有animator，也是我们new出的对象，这个Thread就是MainThread, 没有手动释放的animator还在运行, 这就很明确告诉我们对它处理的相关代码有问题了
<img src="https://jaceho.github.io/assets/img/928566-7c9c533279454729.png?imageMogr2/auto-orient/strip%7CimageView2/2/w/1240" alt="EA7CBD37-F2F3-4E95-A18A-D180F4C78686.png" /></p>
      </li>
    </ul>
  </li>
</ul>

<p><strong>上面寻找内存泄漏的方法也同样使用于内存优化的过程，如果所有对象和内存能够合理释放，在<code class="language-plaintext highlighter-rouge">dominator tree</code>中找到dominator node，看它是否可以释放，如果可以就release掉它，这样由他支配的其他节点也会被回收，如此这样内存便可以持续优化了。</strong></p>]]></content><author><name></name></author><category term="hprof" /><category term="android" /><category term="内存" /><summary type="html"><![CDATA[A small leak will sink a great ship.]]></summary></entry><entry><title type="html">android内存优化之webview</title><link href="https://jaceho.github.io/android-webview/" rel="alternate" type="text/html" title="android内存优化之webview" /><published>2016-06-01T00:00:00+00:00</published><updated>2016-06-01T00:00:00+00:00</updated><id>https://jaceho.github.io/android-webview</id><content type="html" xml:base="https://jaceho.github.io/android-webview/"><![CDATA[<blockquote>
  <p>提起android端的webview，它既是天使，又是魔鬼。</p>
</blockquote>

<p><em>在混合型app中它是主角，一切由它呈现，如58同城，赶集网等；在另一些超级app中亦有它的影子，微信，qq，支付宝，没有一个超级app能少了它，既能展示最新最潮的实时资讯，又能扮演盘踞一方的全功能型网站，与native结合后又能扮演诸如公众号之内的应用等等，其能力可想而知。</em></p>

<p>webview在android端的演化可谓<em>曲折</em>，2015年google宣布不在支持4.4版本一下的webview<sup id="fnref:note-gg" role="doc-noteref"><a href="#fn:note-gg" class="footnote" rel="footnote">1</a></sup>，这意味着目前扔有近四分之一的Android用户因无法获得Google的支持而受到安全威胁。对于深度依赖webview的巨头开始自家的内核及上层sdk以求提升整体稳定性及其性能,腾讯x5内核是比较通用的一种.</p>

<p>目前大致的webview内存处理方式分为两类:</p>

<h3 id="1独立的web进程与主进程隔开">1.独立的web进程，与主进程隔开</h3>
<p>这个方法被运用于类似qq，微信这样的超级app中，这也是解决任何webview内存问题屡试不爽的方法
对于封装的webactivity，在<code class="language-plaintext highlighter-rouge">manifest.xml</code>中设置</p>
<div class="language-plaintext highlighter-rouge"><div class="highlight"><pre class="highlight"><code>&lt;activity android:name=".webview.WebViewActivity" android:launchMode="singleTop" android:process=":remote" android:screenOrientation="unspecified" /&gt;
</code></pre></div></div>
<p>然后在关闭webactivity时销毁进程</p>
<div class="language-plaintext highlighter-rouge"><div class="highlight"><pre class="highlight"><code>@Overrideprotected void onDestroy() {                
     super.onDestroy(); 
     System.exit(0);
}
</code></pre></div></div>
<p>关闭浏览器后便销毁整个进程，这样一般<code class="language-plaintext highlighter-rouge">95%</code>的情况下不会造成内存泄漏之类的问题，但这就涉及到<a href="http://blog.csdn.net/hitlion2008/article/details/9824009">android进程间通讯</a>，比较不方便处理， 优劣参半，也是可选的一个方案.</p>

<h3 id="2封装过的webview">2.封装过的webview</h3>
<p>相比系统内置的webview的支持自2005年之后就没有了，而首推google的chrome。 腾讯的x5webview对h5的兼容性与稳定性与安全性逐渐凸显出来，并自成一系, 下面以使用<a href="http://x5.tencent.com/">x5webview</a>为例做说明:</p>

<ul>
  <li>首先使用webview的时候，不在xml里面声明，而是直接代码new个对象，传入application context防止activity引用滥用.
    <div class="language-plaintext highlighter-rouge"><div class="highlight"><pre class="highlight"><code>webView =  new BridgeWebView(getContext().getApplicationContext());
webFrameLayout.addView(webView, 0);
</code></pre></div>    </div>
    <p>在使用了这个方式后，基本上90%的webview内存泄漏的问题便得以解决.</p>
  </li>
  <li>而在android4.4版本以下，会出现android webview无法自动释放，如在<code class="language-plaintext highlighter-rouge">fragment</code>中,使用<code class="language-plaintext highlighter-rouge">ondetach</code>的释放webview是比较好的时机[^note-time]
    <div class="language-plaintext highlighter-rouge"><div class="highlight"><pre class="highlight"><code>public void onDetach() {
  releaseWebViews();
  super.onDetach();
}
public synchronized void releaseWebViews() {
  if(webView != null) {
      try {
          if(webView.getParent() != null) {
              ((ViewGroup) webView.getParent()).removeView(webView);
          }
//                if (Build.VERSION.SDK_INT &gt;= Build.VERSION_CODES.JELLY_BEAN_MR2) {
//this is causing the segfault occasionally below 4.2
          webView.destroy();
  //                }
      }catch (IllegalArgumentException e) {
          DLog.p(e);
      }
      RefWatcher refWatcher = FApplication.getRefWatcher();
      refWatcher.watch(webView);
      webView = null;
  }
}
</code></pre></div>    </div>
    <p>其中webview自身的销毁代码如下：</p>
    <div class="language-plaintext highlighter-rouge"><div class="highlight"><pre class="highlight"><code>@Override
public void destroy()
//flushMessageQueue();
  clearCache(true);
  clearFormData();
  clearMatches();
  clearSslPreferences();
  clearDisappearingChildren();
  clearHistory();
  //@Deprecated
  //clearView();
  clearAnimation();
  loadUrl("about:blank");
  removeAllViews();
  freeMemory();
  super.destroy();
}
</code></pre></div>    </div>
  </li>
  <li>如果以上的方案还不管用，实时加入<code class="language-plaintext highlighter-rouge">反射</code>来清理webview的引用：
    <div class="language-plaintext highlighter-rouge"><div class="highlight"><pre class="highlight"><code>public void setConfigCallback(WindowManager windowManager) {
  try {
      Field field = WebView.class.getDeclaredField("mWebViewCore");
      field = field.getType().getDeclaredField("mBrowserFrame");
      field = field.getType().getDeclaredField("sConfigCallback");
      field.setAccessible(true);
      Object configCallback = field.get(null);
      if (null == configCallback) {
          return;
      }
      field = field.getType().getDeclaredField("mWindowManager");
      field.setAccessible(true);
      field.set(configCallback, windowManager);
  } catch(Exception e) {
  }
}
</code></pre></div>    </div>
    <p>然后在activity中加入</p>
    <div class="language-plaintext highlighter-rouge"><div class="highlight"><pre class="highlight"><code>public void onCreate(BundlesavedInstanceState){
  super.onCreate(savedInstanceState);
  setConfigCallback((WindowManager);
  getApplicationContext().getSystemService(Context.WINDOW_SERVICE));
}
publicvoidonDestroy()
{
  setConfigCallback(null);
  super.onDestroy();
}
</code></pre></div>    </div>
  </li>
  <li>对于application 级别的可能的misbehaving callbacks，加入
    <div class="language-plaintext highlighter-rouge"><div class="highlight"><pre class="highlight"><code>private static String[] misbehavingClasses = new String[]{
  "com.google.android.gms.ads",
  "com.android.org.chromium.android_webview.AwContents$AwComponentCallbacks",
};
public static boolean isMisbehavingCallBacks(String name){
  for(String s : misbehavingClasses){
      if(name.startsWith(s)){
          return true;
      }
  }
  return false;
}
</code></pre></div>    </div>
    <p>然后重写applicaiton类记录这些callback, 并在适当的时机删掉：</p>
  </li>
</ul>

<div class="language-plaintext highlighter-rouge"><div class="highlight"><pre class="highlight"><code>@Override
public void registerComponentCallbacks(ComponentCallbacks callback) {
    super.registerComponentCallbacks(callback);
    ComponentCallbacksBehavioralAdjustmentToolIcs.INSTANCE.onComponentCallbacksRegistered(callback);
}

@Override
public void unregisterComponentCallbacks(ComponentCallbacks callback) {
    ComponentCallbacksBehavioralAdjustmentToolIcs.INSTANCE.onComponentCallbacksUnregistered(callback);
    super.unregisterComponentCallbacks(callback);
}

public void forceUnregisterComponentCallbacks() {
    ComponentCallbacksBehavioralAdjustmentToolIcs.INSTANCE.unregisterAll(this);
}


private static class ComponentCallbacksBehavioralAdjustmentToolIcs {
    private static final String TAG = "componentCallbacks";
    static ComponentCallbacksBehavioralAdjustmentToolIcs INSTANCE = new ComponentCallbacksBehavioralAdjustmentToolIcs();

    private WeakHashMap&lt;ComponentCallbacks, ApplicationErrorReport.CrashInfo&gt; mCallbacks = new WeakHashMap&lt;&gt;();
    private boolean mSuspended = false;

    public void onComponentCallbacksRegistered(ComponentCallbacks callback) {
        Throwable thr = new Throwable("Callback registered here.");
        ApplicationErrorReport.CrashInfo ci = new ApplicationErrorReport.CrashInfo(thr);

        if (FApplication.DEBUG) DLog.w(TAG, "registerComponentCallbacks: " + callback.getClass().getName(), thr);

        if (!mSuspended) {
            if (BugFix.isMisbehavingCallBacks(callback.getClass().getName())) {
                mCallbacks.put(callback, ci);
            }
            // TODO: other classes may still prove to be problematic?  For now, only watch for .gms.ads, since we know those are misbehaving
        } else {
            if (FApplication.DEBUG) DLog.e(TAG, "ComponentCallbacks was registered while tracking is suspended!");
        }
    }

    public void onComponentCallbacksUnregistered(ComponentCallbacks callback) {
        if (!mSuspended) {
            if (FApplication.DEBUG) {
                DLog.i(TAG, "unregisterComponentCallbacks: " + callback, new Throwable());
            }

            mCallbacks.remove(callback);
        }
    }

    public void unregisterAll(Context context) {
        mSuspended = true;
        for (Map.Entry&lt;ComponentCallbacks, ApplicationErrorReport.CrashInfo&gt; entry : mCallbacks.entrySet()) {
            ComponentCallbacks callback = entry.getKey();
            if (callback == null) continue;

            if (FApplication.DEBUG) {
                DLog.w(TAG, "Forcibly unregistering a misbehaving ComponentCallbacks: " + entry.getKey());
                DLog.w(TAG, entry.getValue().stackTrace);
            }

            try {
                context.unregisterComponentCallbacks(entry.getKey());
            } catch (Exception exc) {
                if (FApplication.DEBUG) DLog.e(TAG, "Unable to unregister ComponentCallbacks", exc);
            }
        }

        mCallbacks.clear();
        mSuspended = false;
    }
}
</code></pre></div></div>

<h5 id="为方便webactivity的debug">为方便webactivity的debug</h5>
<ul>
  <li>在<code class="language-plaintext highlighter-rouge">application</code>的<code class="language-plaintext highlighter-rouge">oncreate</code>里面，我们加入
    <div class="language-plaintext highlighter-rouge"><div class="highlight"><pre class="highlight"><code>private static void enableStrictMode() {
StrictMode.ThreadPolicy.Builder threadPolicyBuilder =
  new StrictMode.ThreadPolicy.Builder()
  .detectAll()
  .penaltyLog();
  StrictMode.VmPolicy.Builder vmPolicyBuilder =
  new StrictMode.VmPolicy.Builder()
  .detectAll()
  .penaltyLog();
  threadPolicyBuilder.penaltyFlashScreen();
  vmPolicyBuilder.setClassInstanceLimit(WebActivity.class, 1);
  StrictMode.setThreadPolicy(threadPolicyBuilder.build());
  StrictMode.setVmPolicy(vmPolicyBuilder.build());
}
</code></pre></div>    </div>
  </li>
  <li>在webview中，对于android4.4以上的版本，我们开启调试模式
    <div class="language-plaintext highlighter-rouge"><div class="highlight"><pre class="highlight"><code>if (FApplication.DEBUG &amp;&amp; Build.VERSION.SDK_INT &gt;= Build.VERSION_CODES.KITKAT) {
  WebView.setWebContentsDebuggingEnabled(true);
}
</code></pre></div>    </div>
  </li>
  <li>最后不可缺少的是, leakcanary的加入来跟踪这些消耗内存的组件:
在<code class="language-plaintext highlighter-rouge">webfragment</code>，<code class="language-plaintext highlighter-rouge">webactivity</code>，<code class="language-plaintext highlighter-rouge">webview</code> ondestory后加上
    <div class="language-plaintext highlighter-rouge"><div class="highlight"><pre class="highlight"><code>  RefWatcher refWatcher = FApplication.getRefWatcher();
  refWatcher.watch(obj);
</code></pre></div>    </div>
  </li>
</ul>

<blockquote>
  <p>总结: 如果你只是简单地用 webview 做呈现, 使用application context启动webview已经足够了，但如果你需要webview来播放视频，处理弹窗等复杂工作, 新建一个进程来处理会更可靠.</p>
</blockquote>

<p>](http://www.leiphone.com/news/201501/1NkxWlVGV1IVMUyr.html)
[^note-time]:<a href="http://stackoverflow.com/a/12408703/1369016">this is how I fixed my WebView leak inside a fragment</a></p>
<div class="footnotes" role="doc-endnotes">
  <ol>
    <li id="fn:note-gg" role="doc-endnote">
      <p>[Google将不再为Android 4.4之前版本提供WebView补丁 <a href="#fnref:note-gg" class="reversefootnote" role="doc-backlink">&#8617;</a></p>
    </li>
  </ol>
</div>]]></content><author><name></name></author><category term="webview" /><category term="android" /><category term="内存" /><summary type="html"><![CDATA[提起android端的webview，它既是天使，又是魔鬼。]]></summary></entry><entry><title type="html">ubuntu grub修复启动项</title><link href="https://jaceho.github.io/ubuntu_grub_repair_startup_items/" rel="alternate" type="text/html" title="ubuntu grub修复启动项" /><published>2013-01-04T12:14:15+00:00</published><updated>2013-01-04T12:14:15+00:00</updated><id>https://jaceho.github.io/ubuntu_grub_repair_startup_items</id><content type="html" xml:base="https://jaceho.github.io/ubuntu_grub_repair_startup_items/"><![CDATA[<div id="BlogArticleDetail" style="font-size: 14px;"><span style="font-size: small;"><span style="font-size: large;"><b>Grub Rescue commands<&#47;b><&#47;span> <&#47;span><span style="font-size: small;">I<&#47;span><span style="font-size: small;">f <b>Grub is missing<&#47;b> after installing Ubuntu and screen is showing <b>Grub Rescue<&#47;b>, then Ubuntu <b>grub<&#47;b> <b>rescue or restore<&#47;b> has to done. It can be done through Ubuntu Server CD or <b>Ubuntu Desktop CD<&#47;b>.&nbsp;<&#47;span><br />
<span style="font-size: small;">If <span style="font-size: small;">a<&#47;span>t system start up you might be seeing the option <b>Grub Rescue or Grub missing<&#47;b><span style="font-size: small;"> option then you <span style="font-size: small;">need to follow the below commands.<&#47;span><&#47;span><&#47;span></p>
<div style="font-family: inherit;"><span style="font-size: small;">This article will show how to do <b>Ubuntu grub rescue<&#47;b> with screen shots using Ubuntu Desktop CD. These <span style="font-size: small;">screenshots<&#47;span>&nbsp; have been taken on Ubuntu 11.04. The very same method can be used to repair <b>grub mint Debian<&#47;b>. <&#47;span><&#47;div><br />
<span style="font-size: small;"><span style="font-family: inherit;">If you don't have the desktop CD then <span style="font-size: small;">you can use<&#47;span> Ubuntu server CD or USB also.&nbsp;<&#47;span><&#47;span></p>
<div style="font-family: inherit;"><span style="font-size: small;"> To do grub rescue through Ubuntu Server CD see&nbsp;<&#47;span><&#47;div><br />
<span style="font-size: small;">"<i style="color: blue;"><b>Install Grub from Ubuntu server CD<&#47;b><&#47;i>".<&#47;span></p>
<p><span style="font-size: small;"><i><b>NOTE:<&#47;b><&#47;i><b>&nbsp; <&#47;b>You will get <&#47;span><b><span style="font-size: large;">&#47;usr&#47;sbin&#47;grub-probe: error: cannot stat 'aufs'<&#47;span><&#47;b><span style="font-size: small;">&nbsp; error if <&#47;span>you didn't follow the commands listed below. Specifically you did not do chroot,<br />
i.e. <span style="font-size: small;"><i><b> sudo chroot &#47;mnt<&#47;b><&#47;i><&#47;span>.<span style="font-size: small;">&nbsp;<&#47;span><br />
<a id="more"></a><a id="more-13"></a><br />
<span style="font-size: small;">For <b>Ubuntu grub rescue<&#47;b> follow these steps:<&#47;span><br />
<span style="font-size: small;">1.Boot from the <b>Ubuntu Desktop live CD<&#47;b>.&nbsp;<&#47;span></p>
<p><span style="font-size: small;"><br />
<&#47;span></p>
<table class="tr-caption-container" style="margin-left: auto; margin-right: auto; text-align: center;" width="369" cellspacing="0" cellpadding="0" align="center">
<tbody>
<tr>
<td style="text-align: center;"><img class="alignnone" alt="" src="https:&#47;&#47;help.ubuntu.com&#47;community&#47;LiveCD?action=AttachFile&amp;do=get&amp;target=804+Live+2+.png" width="640" height="480" &#47;><&#47;td><br />
<&#47;tr></p>
<tr>
<td class="tr-caption" style="text-align: center;">Ubuntu grub rescue-1<&#47;td><br />
<&#47;tr><br />
<&#47;tbody><br />
<&#47;table></p>
<div class="separator" style="clear: both; text-align: center;"><&#47;div><br />
<span style="font-size: small;">&nbsp;&nbsp;&nbsp;&nbsp;&nbsp;&nbsp;&nbsp;&nbsp;&nbsp;&nbsp;&nbsp;&nbsp;&nbsp;&nbsp;&nbsp;&nbsp;&nbsp;&nbsp;&nbsp;&nbsp;&nbsp;&nbsp;&nbsp;&nbsp;&nbsp; Select Try Ubuntu.&nbsp;&nbsp;&nbsp;&nbsp;&nbsp;<&#47;span><br />
<a href="http:&#47;&#47;www.blogger.com&#47;blogger.g?blogID=3974554257572840501" rel="nofollow" name="more"><&#47;a><span style="font-size: small;"><br />
<&#47;span><span style="font-size: small;">2.In Live Desktop session open terminal.&nbsp;<&#47;span><br />
<span style="font-size: small;">&nbsp; Application ->Accessories->Terminal.<&#47;span><br />
<span style="font-size: small;"><br />
<&#47;span><span style="font-size: small;">3. In Terminal tpye <i style="color: red;"><b style="color: blue;">sudo fdisk -l<&#47;b><b> &nbsp; <&#47;b><b><span style="color: black;">.&nbsp;<&#47;span><&#47;b><&#47;i><&#47;span><br />
<span style="font-size: small;"><i style="color: red;"><b><span style="color: black;">&nbsp; &nbsp; <&#47;span><&#47;b><&#47;i><span style="color: red;"><span style="color: black;">It will display all partiton of the disk.<&#47;span><&#47;span><&#47;span></p>
<table class="tr-caption-container" style="margin-left: auto; margin-right: auto; text-align: center;" cellspacing="0" cellpadding="0" align="center">
<tbody>
<tr>
<td style="text-align: center;"><a href="http:&#47;&#47;blog.futureme.info&#47;wp-content&#47;uploads&#47;2013&#47;01&#47;Screenshot-from-2013-02-12-221619.png"><img class="aligncenter size-full wp-image-489" alt="Screenshot from 2013-02-12 22:16:19" src="http:&#47;&#47;blog.futureme.info&#47;wp-content&#47;uploads&#47;2013&#47;01&#47;Screenshot-from-2013-02-12-221619.png" width="672" height="412" &#47;><&#47;a><&#47;td><br />
<&#47;tr></p>
<tr>
<td class="tr-caption" style="text-align: center;">Ubuntu grub rescue screenshot-2<&#47;td><br />
<&#47;tr><br />
<&#47;tbody><br />
<&#47;table></p>
<div class="separator" style="clear: both; text-align: center;"><&#47;div><br />
<span style="font-size: small;"><span style="color: red;"><span style="color: black;">&nbsp;<&#47;span><&#47;span><i style="color: red;"><b><&#47;b><&#47;i><&#47;span><br />
<span style="font-size: small;">The partation which have <i><b>Linux<&#47;b><&#47;i> under <i><b>System<&#47;b><&#47;i> column is your drive in which ubuntu linux is installed. In screenshot ubuntu partition drive is <i><b>&#47;dev&#47;sda11<&#47;b><&#47;i>.<&#47;span><br />
<span style="font-size: small;"><br />
<&#47;span><span style="font-size: small;">4. Mount the ubuntu partition drive<&#47;span><br />
<span style="font-size: small;">&nbsp; &nbsp;&nbsp; <&#47;span><span style="font-size: small;">&nbsp; <i><b>sudo mount &#47;dev&#47;sdXX &#47;mnt<&#47;b><&#47;i>&nbsp;<&#47;span><span style="font-size: small;"> (example 'sudo mount &#47;dev&#47;sda11 &#47;mnt' ,don't miss the spaces.)<&#47;span><br />
<span style="font-size: small;"><br />
<&#47;span><span style="font-size: small;">5.<&#47;span><span style="font-size: small;">Only if you have a separate boot partition: <&#47;span></p>
<div lang="en" style="line-height: 115%; margin-bottom: 0.35cm;"><span style="font-size: small;">&nbsp;&nbsp; <&#47;span><span style="font-size: small;">&nbsp; &nbsp; &nbsp;&nbsp;&nbsp;&nbsp; <b><i>sudo mount &#47;dev&#47;sdYY &#47;mnt&#47;boot.<&#47;i><&#47;b><&#47;span><&#47;div></p>
<div lang="en" style="line-height: 115%; margin-bottom: 0.35cm;"><span style="font-size: small;">&nbsp;6.&nbsp; <&#47;span><span style="font-size: small;">Mount the virtual filesystems: <&#47;span><br />
<span style="font-size: small;"><i><b>&nbsp;&nbsp;&nbsp;&nbsp;&nbsp;&nbsp;&nbsp;&nbsp;&nbsp;&nbsp;&nbsp;&nbsp;<&#47;b><&#47;i><&#47;span><br />
<span style="font-size: small;"><i><b>&nbsp;&nbsp;&nbsp;&nbsp;&nbsp;&nbsp;&nbsp;&nbsp;&nbsp;&nbsp;&nbsp; sudo mount --bind &#47;dev &#47;mnt&#47;dev<&#47;b><&#47;i><&#47;span></p>
<div lang="en" style="line-height: 115%; margin-bottom: 0.35cm;"><span style="font-size: small;"><i><b>&nbsp;&nbsp;&nbsp;&nbsp;&nbsp;&nbsp;&nbsp;&nbsp;&nbsp;&nbsp;&nbsp; sudo mount --bind &#47;proc &#47;mnt&#47;proc&nbsp;<&#47;b><&#47;i><&#47;span><br />
<span style="font-size: small;"><i><b>&nbsp;&nbsp;&nbsp;&nbsp;&nbsp;&nbsp;&nbsp;&nbsp;&nbsp;&nbsp;&nbsp; sudo mount --bind &#47;sys &#47;mnt&#47;sys<&#47;b><&#47;i><&#47;span><&#47;div><br />
<span style="font-size: small;">7. <&#47;span><span style="font-size: small;">To ensure that only the grub utilities from the LiveCD get executed, mount &#47;usr <&#47;span><span style="font-size: small;"> &nbsp;&nbsp;&nbsp;&nbsp;<&#47;span><br />
<span style="font-size: small;">&nbsp;&nbsp;<i><b>&nbsp;&nbsp; sudo mount --bind &#47;usr&#47; &#47;mnt&#47;usr<&#47;b><&#47;i><i><b>&nbsp;<&#47;b><&#47;i><&#47;span><br />
<span style="font-size: small;"><i><b>&nbsp;&nbsp;&nbsp;&nbsp; sudo chroot &#47;mnt <&#47;b><&#47;i><&#47;span><span style="font-size: small;">&nbsp;<&#47;span></p>
<p><span style="font-size: small;">8. If there is no &#47;boot&#47;grub&#47;grub.cfg or it's not correct, create one using<&#47;span><span style="font-size: small;">&nbsp;<&#47;span><br />
<span style="font-size: small;">&nbsp; &nbsp; &nbsp; &nbsp; &nbsp;&nbsp;<i><b> update-grub<&#47;b><&#47;i>&nbsp;<&#47;span><br />
<span style="font-size: small;">&nbsp;&nbsp;&nbsp;&nbsp;&nbsp; or&nbsp; <i><b>update-grub2<&#47;b><&#47;i><&#47;span></p>
<p><&#47;div></p>
<div lang="en" style="line-height: 115%; margin-bottom: 0.35cm;"><span style="font-size: small;">9.Now reinstall Grub <i><b>&nbsp;<&#47;b><&#47;i><&#47;span><br />
<span style="font-size: small;"><i><b>&nbsp;&nbsp;&nbsp;&nbsp;&nbsp;&nbsp;&nbsp;&nbsp; grub-install &#47;dev&#47;sdX<&#47;b><&#47;i>&nbsp; (e.g. grub-install &#47;dev&#47;sda. Do not specify the partition number.<&#47;span><span style="font-size: small;">&nbsp; &nbsp;<&#47;span><&#47;div></p>
<div lang="en" style="line-height: 115%; margin-bottom: 0.35cm;"><span style="font-size: small;">&nbsp;10. Verify the install&nbsp;<&#47;span><br />
<span style="font-size: small;">&nbsp; &nbsp; &nbsp; &nbsp; <i><b>sudo grub-install --recheck &#47;dev&#47;sdX<&#47;b><&#47;i><&#47;span><&#47;div></p>
<div lang="en" style="line-height: 115%; margin-bottom: 0.35cm;"><span style="font-size: small;">11. Exit chroot : <i><b>CTRL-D<&#47;b><&#47;i> on keyboard.<&#47;span><&#47;div></p>
<div lang="en" style="line-height: 115%; margin-bottom: 0.35cm;">
<p><span style="font-size: small;">12. <&#47;span><span style="font-size: small;">Unmount virtual filesystems:<&#47;span><span style="font-size: small;"> <i><b>&nbsp;<&#47;b><&#47;i><&#47;span><br />
<span style="font-size: small;"><i><b>&nbsp;&nbsp;&nbsp;&nbsp;&nbsp;&nbsp;&nbsp;&nbsp;&nbsp;&nbsp; sudo umount &#47;mnt&#47;dev<&#47;b><&#47;i><i><b>&nbsp;<&#47;b><&#47;i><&#47;span><br />
<span style="font-size: small;"><i><b>&nbsp;&nbsp;&nbsp;&nbsp;&nbsp;&nbsp;&nbsp;&nbsp;&nbsp;&nbsp; sudo umount &#47;mnt&#47;proc<&#47;b><&#47;i><&#47;span><br />
<span style="font-size: small;"><i><b>&nbsp;&nbsp;&nbsp;&nbsp;&nbsp;&nbsp;&nbsp;&nbsp;&nbsp;&nbsp; sudo umount &#47;mnt&#47;sys<&#47;b><&#47;i><&#47;span><span style="font-size: small;">&nbsp;<&#47;span></p>
<p><span style="font-size: small;">If you mounted a separate &#47;boot partition:<&#47;span><span style="font-size: small;">&nbsp;&nbsp;<&#47;span><br />
<span style="font-size: small;"><i><b>&nbsp;&nbsp;&nbsp;&nbsp;&nbsp;&nbsp;&nbsp;&nbsp;&nbsp;&nbsp; sudo umount &#47;mnt&#47;boot<&#47;b><&#47;i>&nbsp;<&#47;span></p>
<p><span style="font-size: small;">13. Unmount the LiveCD's &#47;usr directory:<&#47;span><span style="font-size: small;"><i><b>&nbsp;<&#47;b><&#47;i><&#47;span><br />
<span style="font-size: small;"><i><b>&nbsp;&nbsp;&nbsp;&nbsp;&nbsp;&nbsp;&nbsp;&nbsp;&nbsp; sudo umount &#47;mnt&#47;usr<&#47;b><&#47;i><&#47;span></p>
<p><span style="font-size: small;">14. Unmount last device:<i><b>&nbsp;<&#47;b><&#47;i><&#47;span><br />
<span style="font-size: small;"><i><b>&nbsp;&nbsp;&nbsp;&nbsp;&nbsp;&nbsp;&nbsp;&nbsp;&nbsp;&nbsp; sudo umount &#47;mnt<&#47;b><&#47;i> <&#47;span></p>
<p><&#47;div></p>
<div lang="en" style="line-height: 115%; margin-bottom: 0.35cm;"><&#47;div><br />
<span style="font-size: small;">15. Reboot.<i><b>&nbsp;<&#47;b><&#47;i><&#47;span><br />
<span style="font-size: small;"><i><b>&nbsp;&nbsp;&nbsp;&nbsp;&nbsp;&nbsp;&nbsp;&nbsp; sudo reboot.<&#47;b><&#47;i><&#47;span></p>
<p><span style="font-size: small;"><i><b>NOTE:<&#47;b><&#47;i><b> <&#47;b>If you are getting <&#47;span><span style="font-size: large;">&#47;usr&#47;sbin&#47;grub-probe: error: cannot stat 'aufs'<&#47;span><span style="font-size: small;">&nbsp; error then the possible reason is that <&#47;span>you didn't follow the commands listed above. Specifically you did not do chroot,<br />
ie <span style="font-size: small;"><i><b> sudo chroot &#47;mnt<&#47;b><&#47;i><&#47;span>.<br />
Follow the above steps correctly and you are done.</p>
<p><&#47;div></p>]]></content><author><name>{&quot;display_name&quot;=&gt;&quot;hippo&quot;, &quot;login&quot;=&gt;&quot;admin&quot;, &quot;email&quot;=&gt;nil, &quot;url&quot;=&gt;&quot;https://jaceho.github.io&quot;}</name></author><category term="ubuntu" /><category term="ubuntu" /><category term="grub" /><category term="rescue" /><summary type="html"><![CDATA[Grub Rescue commands If Grub is missing after installing Ubuntu and screen is showing Grub Rescue, then Ubuntu grub rescue or restore has to done. It can be done through Ubuntu Server CD or Ubuntu Desktop CD.&nbsp; If at system start up you might be seeing the option Grub Rescue or Grub missing option then you need to follow the below commands. This article will show how to do Ubuntu grub rescue with screen shots using Ubuntu Desktop CD. These screenshots&nbsp; have been taken on Ubuntu 11.04. The very same method can be used to repair grub mint Debian. If you don't have the desktop CD then you can use Ubuntu server CD or USB also.&nbsp; To do grub rescue through Ubuntu Server CD see&nbsp; "Install Grub from Ubuntu server CD". NOTE:&nbsp; You will get &#47;usr&#47;sbin&#47;grub-probe: error: cannot stat 'aufs'&nbsp; error if you didn't follow the commands listed below. Specifically you did not do chroot, i.e. sudo chroot &#47;mnt.&nbsp;]]></summary></entry><entry><title type="html">pprime</title><link href="https://jaceho.github.io/pprime/" rel="alternate" type="text/html" title="pprime" /><published>2012-12-31T04:14:12+00:00</published><updated>2012-12-31T04:14:12+00:00</updated><id>https://jaceho.github.io/pprime</id><content type="html" xml:base="https://jaceho.github.io/pprime/"><![CDATA[<p><!DOCTYPE html PUBLIC "-&#47;&#47;W3C&#47;&#47;DTD HTML 4.01 Transitional&#47;&#47;EN"></p>
<p><html><br />
<head><br />
  <meta name="generator" content=<br />
  "HTML Tidy for Linux (vers 25 March 2009), see www.w3.org"></p>
<p>  <title><&#47;title></p>
<style type="text&#47;css">
div.c3 {font-size: 14px;}<br />
  div.c2 {text-align: center}<br />
  span.c1 {font-family: Verdana,Tahoma,sans-serif,Arial,Lucida Sans,Gill Sans}<br />
  <&#47;style><br />
<&#47;head></p>
<p><body></p>
<div id="BlogArticleDetail" class="c3">
<pre>
All tests OK. <br>Your program ('pprime') produced all correct answers!  This is your submission #10 for this problem.  <b>Congratulations!<&#47;b> <br><br>无论判断<span class="c1">所<&#47;span>有质数还是回文数都无法解决，必须按位广搜，分支限界。<br />
<&#47;pre></p>
<div class="c2">
<h1>Prime Palindromes<&#47;h1><br />
    <&#47;div></p>
<p>The number 151 is a prime palindrome because it is both a<br />
    prime number and a palindrome (it is the same number when read<br />
    forward as backward). Write a program that finds all prime<br />
    palindromes in the range of two supplied numbers a and b (5<br />
    <= a < b <= 100,000,000); both a and b are considered<br />
    to be within the range .<&#47;p><br />
<a id="more"></a><a id="more-21"></a></p>
<h3>PROGRAM NAME: pprime<&#47;h3></p>
<h3>INPUT FORMAT<&#47;h3></p>
<table>
<tbody>
<tr>
<td>Line 1:<&#47;td></p>
<td>Two integers, a and b<&#47;td><br />
        <&#47;tr><br />
      <&#47;tbody><br />
    <&#47;table></p>
<h3>SAMPLE INPUT (file pprime.in)<&#47;h3></p>
<pre>
5 500<br />
<&#47;pre></p>
<h3>OUTPUT FORMAT<&#47;h3>The list of palindromic primes in<br />
    numerical order, one per line.</p>
<h3>SAMPLE OUTPUT (file pprime.out)<&#47;h3></p>
<pre>
5 7 11 101 131 151 181 191 313 353 373 383<br>&#47;*<br>ID: hippo he<br>LANG: C++<br>TASK: pprime<br>*&#47;<br>#include<iostream><br>#include<stack><br>#include<vector><br>#include<fstream><br>#include <queue><br>#include<algorithm><br>using namespace std;<br>int A,B;<br>typedef pair<int,int> Node;<br>void input(){<br>    ifstream in("pprime.in");<br>    in>>A>>B;<br>    in.close();<br>}<br>void output(vector<int>&amp; res){<br>    ofstream out("pprime.out");<br>    for (int it = 0; it < res.size(); it++) {<br>        out<<res[it]<<endl;<br>    }<br>    out.close();<br>}<br>bool isprime(int n)<br>{<br>    if(n==2||n==3||n==5||n==7)return true;<br>    else if(n==1||n%2==0)return false;<br>    for(int i=3;i*i<=n;i+=2)<br>        if(n%i==0)return false;<br>    return true;<br>}<br>int reflect(Node a){<br>    int n=a.first;<br>    int depth=a.second;<br>    stack<int> tmp1,tmp2;<br>    while(depth--){<br>        tmp1.push(n%10);<br>        n&#47;=10;<br>    }<br>    while(!tmp1.empty()){<br>        tmp2.push(tmp1.top());<br>        tmp1.pop();<br>    }<br>    tmp1=tmp2;<br><br>    while(!tmp1.empty()){<br>        tmp2.push(tmp1.top());<br>        tmp1.pop();<br>    }<br><br>    int res=0;<br>    res+=tmp2.top();<br>    tmp2.pop();<br>    while(!tmp2.empty()){<br>        res*=10;<br>        res+=tmp2.top();<br>        tmp2.pop();<br>    }<br>    return res;<br>}<br>int reverse(Node a){<br>    int n=a.first;<br>    int depth=a.second;<br>    stack<int> tmp1,tmp2;<br>    while(depth--){<br>        tmp1.push(n%10);<br>        n&#47;=10;<br>    }<br>    while(!tmp1.empty()){<br>        tmp2.push(tmp1.top());<br>        tmp1.pop();<br>    }<br>    tmp1=tmp2;<br><br>    tmp2.pop();<br>    while(!tmp1.empty()){<br>        tmp2.push(tmp1.top());<br>        tmp1.pop();<br>    }<br><br>    int res=0;<br>    res+=tmp2.top();<br>    tmp2.pop();<br>    while(!tmp2.empty()){<br>        res*=10;<br>        res+=tmp2.top();<br>        tmp2.pop();<br>    }<br>    return res;<br>}<br>void bfs(int init,vector<int>&amp; res,int depth,int max,int min){<br>    queue<Node> ints;<br>    Node ini;<br>    ini.first=init;<br>    ini.second=1;<br>    if(ini.second*2-1<=depth)<br>        ints.push(ini);<br><br>    int x=reflect(ini);<br>    int y=reverse(ini);<br>    if(x>=min&amp;&amp;x<=max&amp;&amp;isprime(x)&amp;&amp;ini.second*2<=depth)<br>        res.push_back(x);<br>    if(y>=min&amp;&amp;y<=max&amp;&amp;isprime(y)&amp;&amp;ini.second*2-1<=depth)<br>        res.push_back(y);<br><br>    while(!ints.empty()){<br>        Node tmp=ints.front();<br>        ints.pop();<br>        for (int i = 0; i <= 9; i++) {<br>            Node neb;<br>            neb.first=tmp.first*10+i;<br>            neb.second=tmp.second+1;<br><br>            if(neb.first>max)return;<br>            if(neb.second*2-1<=depth)<br>                ints.push(neb);<br>            else return;<br><br>            int x=reflect(neb);<br>            int y=reverse(neb);<br>            if(x>=min&amp;&amp;x<=max&amp;&amp;isprime(x)&amp;&amp;ini.second*2<=depth)<br>                res.push_back(x);<br>            if(y>=min&amp;&amp;y<=max&amp;&amp;isprime(y)&amp;&amp;ini.second*2-1<=depth)<br>                res.push_back(y);<br><br>        }<br>    }<br>}<br>void Bfs(vector<int> &amp;res,int depth,int max,int min){<br>    bfs(1,res,depth,max,min);<br>    bfs(3,res,depth,max,min);<br>    bfs(5,res,depth,max,min);<br>    bfs(7,res,depth,max,min);<br>    bfs(9,res,depth,max,min);<br>}<br>int main(int argc, const char *argv[])<br>{<br>    vector<int> res;<br>    int depth=0;<br>    input();<br>    int tmp=B;<br>    while(tmp){<br>        tmp&#47;=10;<br>        depth++;<br>    }<br>    Bfs(res,depth,B,A);<br><br>    sort(res.begin(),res.end());<br>    res.erase(unique(res.begin(),res.end()),res.end());<br>    output(res);<br><br>    return 0;<br>}<br> <br><br><br />
<&#47;pre><br />
  <&#47;div><br />
<&#47;body><br />
<&#47;html></p>]]></content><author><name>{&quot;display_name&quot;=&gt;&quot;hippo&quot;, &quot;login&quot;=&gt;&quot;admin&quot;, &quot;email&quot;=&gt;nil, &quot;url&quot;=&gt;&quot;https://jaceho.github.io&quot;}</name></author><category term="usaco" /><category term="prime" /><category term="usaco" /><category term="algorithms" /><summary type="html"><![CDATA[div.c3 {font-size: 14px;} div.c2 {text-align: center} span.c1 {font-family: Verdana,Tahoma,sans-serif,Arial,Lucida Sans,Gill Sans} All tests OK. Your program ('pprime') produced all correct answers! This is your submission #10 for this problem. Congratulations! 无论判断所有质数还是回文数都无法解决，必须按位广搜，分支限界。 Prime Palindromes The number 151 is a prime palindrome because it is both a prime number and a palindrome (it is the same number when read forward as backward). Write a program that finds all prime palindromes in the range of two supplied numbers a and b (5]]></summary></entry><entry><title type="html">sprime</title><link href="https://jaceho.github.io/sprime/" rel="alternate" type="text/html" title="sprime" /><published>2012-12-30T13:16:12+00:00</published><updated>2012-12-30T13:16:12+00:00</updated><id>https://jaceho.github.io/sprime</id><content type="html" xml:base="https://jaceho.github.io/sprime/"><![CDATA[<div id="BlogArticleDetail" style="font-size: 14px;">                     &nbsp;&nbsp;&nbsp;&nbsp; 单向无环图，无记录数组，每位取值2|3|5|7,1|3|5|7|9,...果断广搜。总结点4*5^7=3万，easy!<br &#47;><center><br />
<h1>Superprime Rib<&#47;h1> <&#47;center>
<p>Butchering Farmer John's cows always yields the best prime rib.  You can tell prime ribs by looking at the digits lovingly stamped across them, one by one, by FJ and the USDA.  Farmer John ensures that a purchaser of his prime ribs gets really prime ribs because when sliced from the right, the numbers on the ribs continue to stay prime right down to the last rib, e.g.: <&#47;p>
<pre>     7  3  3  1 <&#47;pre>
<p>The set of ribs denoted by 7331 is prime; the three ribs 733 are prime; the two ribs 73 are prime, and, of course, the last rib, 7, is prime.  The number 7331 is called a superprime of length 4.  <&#47;p>
<p> Write a program that accepts a number N 1 <=N<=8 of ribs and prints all the superprimes of that length.  <&#47;p>
<p> The number 1 (by itself) is not a prime number.  <&#47;p><br />
<h3>PROGRAM NAME: sprime<&#47;h3><br />
<h3>INPUT FORMAT<&#47;h3>  A single line with the number N.<br />
<h3>SAMPLE INPUT (file sprime.in) <&#47;h3>
<pre>4 <&#47;pre><br />
<h3>OUTPUT FORMAT<&#47;h3>  The superprime ribs of length N, printed in ascending order one per line.<br />
<h3>SAMPLE OUTPUT (file sprime.out)<&#47;h3>
<pre>2333 2339 2393 2399 2939 3119 3137 3733 3739 3793 3797 5939 7193 7331 7333 7393 <&#47;pre><a id="more"></a><a id="more-15"></a>  &#47;*<br &#47;>ID: hippo he<br &#47;>LANG: C++<br &#47;>TASK: sprime<br &#47;>*&#47;<br &#47;>#include<iostream><br &#47;>#include<fstream><br &#47;>#include<queue><br &#47;>#include<cstring><br &#47;>#include<vector><br &#47;>using namespace std;<br &#47;><br &#47;>int N;<br &#47;>typedef pair<int,int> Node;<br &#47;>void input(){<br &#47;>&nbsp;&nbsp;&nbsp; ifstream in("sprime.in");<br &#47;>&nbsp;&nbsp;&nbsp; in>>N;<br &#47;>&nbsp;&nbsp;&nbsp; in.close();<br &#47;>}<br &#47;>void output(vector<int> res){<br &#47;>&nbsp;&nbsp;&nbsp; ofstream out("sprime.out");<br &#47;>&nbsp;&nbsp;&nbsp; for (int it = 0; it < res.size(); it++) {<br &#47;>&nbsp;&nbsp;&nbsp;&nbsp;&nbsp;&nbsp;&nbsp; out<<res[it]<<endl;<br &#47;>&nbsp;&nbsp;&nbsp; }<br &#47;>&nbsp;&nbsp;&nbsp; out.close();<br &#47;>}<br &#47;>bool isprime(int n)<br &#47;>{<br &#47;>&nbsp;&nbsp;&nbsp; if(n==2||n==3||n==5||n==7)return true;<br &#47;>&nbsp;&nbsp;&nbsp; else if(n==1||n%2==0)return false;<br &#47;>&nbsp;&nbsp;&nbsp; for(int i=3;i*i<=n;i+=2)<br &#47;>&nbsp;&nbsp;&nbsp;&nbsp;&nbsp;&nbsp;&nbsp; if(n%i==0)return false;<br &#47;>&nbsp;&nbsp;&nbsp; return true;<br &#47;>}<br &#47;>void bfs(int init,vector<int>&amp; res,int depth){<br &#47;>&nbsp;&nbsp;&nbsp; queue<Node> ints;<br &#47;>&nbsp;&nbsp;&nbsp; Node ini;<br &#47;>&nbsp;&nbsp;&nbsp; ini.first=init;<br &#47;>&nbsp;&nbsp;&nbsp; ini.second=1;<br &#47;>&nbsp;&nbsp;&nbsp; ints.push(ini);<br &#47;><br &#47;>&nbsp;&nbsp;&nbsp; if(isprime(ini.first)&amp;&amp;ini.second==depth)<br &#47;>&nbsp;&nbsp;&nbsp;&nbsp;&nbsp;&nbsp;&nbsp; res.push_back(ini.first);<br &#47;><br &#47;>&nbsp;&nbsp;&nbsp; while(!ints.empty()){<br &#47;>&nbsp;&nbsp;&nbsp;&nbsp;&nbsp;&nbsp;&nbsp; Node tmp=ints.front();<br &#47;>&nbsp;&nbsp;&nbsp;&nbsp;&nbsp;&nbsp;&nbsp; ints.pop();<br &#47;>&nbsp;&nbsp;&nbsp;&nbsp;&nbsp;&nbsp;&nbsp; for (int i = 0; i < 5; i++) {<br &#47;>&nbsp;&nbsp;&nbsp;&nbsp;&nbsp;&nbsp;&nbsp;&nbsp;&nbsp;&nbsp;&nbsp; Node neb;<br &#47;>&nbsp;&nbsp;&nbsp;&nbsp;&nbsp;&nbsp;&nbsp;&nbsp;&nbsp;&nbsp;&nbsp; neb.first=tmp.first*10+2*i+1;<br &#47;>&nbsp;&nbsp;&nbsp;&nbsp;&nbsp;&nbsp;&nbsp;&nbsp;&nbsp;&nbsp;&nbsp; neb.second=tmp.second+1;<br &#47;><br &#47;>&nbsp;&nbsp;&nbsp;&nbsp;&nbsp;&nbsp;&nbsp;&nbsp;&nbsp;&nbsp;&nbsp; if(isprime(neb.first))<br &#47;>&nbsp;&nbsp;&nbsp;&nbsp;&nbsp;&nbsp;&nbsp;&nbsp;&nbsp;&nbsp;&nbsp;&nbsp;&nbsp;&nbsp;&nbsp; ints.push(neb);<br &#47;>&nbsp;&nbsp;&nbsp;&nbsp;&nbsp;&nbsp;&nbsp;&nbsp;&nbsp;&nbsp;&nbsp; if(isprime(neb.first)&amp;&amp;(neb.second)==depth)<br &#47;>&nbsp;&nbsp;&nbsp;&nbsp;&nbsp;&nbsp;&nbsp;&nbsp;&nbsp;&nbsp;&nbsp;&nbsp;&nbsp;&nbsp;&nbsp; res.push_back(neb.first);<br &#47;>&nbsp;&nbsp;&nbsp;&nbsp;&nbsp;&nbsp;&nbsp; }<br &#47;>&nbsp;&nbsp;&nbsp;&nbsp;&nbsp;&nbsp;&nbsp; if(tmp.second>depth)break;<br &#47;>&nbsp;&nbsp;&nbsp; }<br &#47;>}<br &#47;>void Bfs(vector<int> &amp;res,int depth){<br &#47;>&nbsp;&nbsp;&nbsp; bfs(2,res,depth);<br &#47;>&nbsp;&nbsp;&nbsp; bfs(3,res,depth);<br &#47;>&nbsp;&nbsp;&nbsp; bfs(5,res,depth);<br &#47;>&nbsp;&nbsp;&nbsp; bfs(7,res,depth);<br &#47;>}<br &#47;>int main(int argc, const char *argv[])<br &#47;>{<br &#47;>&nbsp;&nbsp;&nbsp; vector<int> res;<br &#47;>&nbsp;&nbsp;&nbsp; input();<br &#47;>&nbsp;&nbsp;&nbsp; Bfs(res,N);<br &#47;>&nbsp;&nbsp;&nbsp; output(res);<br &#47;>&nbsp;&nbsp;&nbsp; return 0;<br &#47;>}<br &#47;><br &#47;><&#47;div></p>]]></content><author><name>{&quot;display_name&quot;=&gt;&quot;hippo&quot;, &quot;login&quot;=&gt;&quot;admin&quot;, &quot;email&quot;=&gt;nil, &quot;url&quot;=&gt;&quot;https://jaceho.github.io&quot;}</name></author><category term="usaco" /><category term="prime" /><category term="usaco" /><category term="algorithms" /><summary type="html"><![CDATA[&nbsp;&nbsp;&nbsp;&nbsp; 单向无环图，无记录数组，每位取值2|3|5|7,1|3|5|7|9,...果断广搜。总结点4*5^7=3万，easy! Superprime Rib Butchering Farmer John's cows always yields the best prime rib. You can tell prime ribs by looking at the digits lovingly stamped across them, one by one, by FJ and the USDA. Farmer John ensures that a purchaser of his prime ribs gets really prime ribs because when sliced from the right, the numbers on the ribs continue to stay prime right down to the last rib, e.g.: 7 3 3 1 The set of ribs denoted by 7331 is prime; the three ribs 733 are prime; the two ribs 73 are prime, and, of course, the last rib, 7, is prime. The number 7331 is called a superprime of length 4. Write a program that accepts a number N 1 The number 1 (by itself) is not a prime number. PROGRAM NAME: sprime INPUT FORMAT A single line with the number N. SAMPLE INPUT (file sprime.in) 4 OUTPUT FORMAT The superprime ribs of length N, printed in ascending order one per line. SAMPLE OUTPUT (file sprime.out) 2333 2339 2393 2399 2939 3119 3137 3733 3739 3793 3797 5939 7193 7331 7333 7393]]></summary></entry><entry><title type="html">Number Triangles</title><link href="https://jaceho.github.io/number_triangles/" rel="alternate" type="text/html" title="Number Triangles" /><published>2012-12-28T14:19:12+00:00</published><updated>2012-12-28T14:19:12+00:00</updated><id>https://jaceho.github.io/number_triangles</id><content type="html" xml:base="https://jaceho.github.io/number_triangles/"><![CDATA[<div id="BlogArticleDetail" style="font-size: 14px;">                     &nbsp;&nbsp; 最简单的动态规划，但有一点得注意，用记录数组记录和时要防止其和与初始值相同。<br &#47;><center><br />
<h1>Number Triangles<&#47;h1> <&#47;center>
<p> Consider the number triangle shown below. Write a program that calculates the highest sum of numbers that can be passed on a route that starts at the top and ends somewhere on the base. Each step can go either diagonally down to the left or diagonally down to the right.  <&#47;p><a id="more"></a><a id="more-16"></a></p>
<pre>          7          3   8        8   1   0      2   7   4   4    4   5   2   6   5 <&#47;pre>
<p> In the sample above, the route from 7 to 3 to 8 to 7 to 5 produces the highest sum: 30.  <&#47;p><br />
<h3>PROGRAM NAME: numtri<&#47;h3><br />
<h3>INPUT FORMAT<&#47;h3>  The first line contains R (1 <= R <= 1000), the number of rows. Each subsequent line contains the integers for that particular row of the triangle.  All the supplied integers are non-negative and no larger than 100.<br />
<h3>SAMPLE INPUT (file numtri.in) <&#47;h3>
<pre>5 7 3 8 8 1 0 2 7 4 4 4 5 2 6 5 <&#47;pre><br />
<h3>OUTPUT FORMAT<&#47;h3>  A single line containing the largest sum using the traversal specified.<br />
<h3>SAMPLE OUTPUT (file numtri.out)<&#47;h3>
<pre>30 <br &#47;>&#47;*<br &#47;>ID: hippo he<br &#47;>LANG: C++<br &#47;>TASK: numtri<br &#47;>*&#47;<br &#47;>#include<iostream><br &#47;>#include<fstream><br &#47;>#include<cstring><br &#47;>using namespace std;<br &#47;>int prev[2][1000][1000];<br &#47;>int R;<br &#47;>void input(){<br &#47;>    ifstream file("numtri.in");<br &#47;>    file>>R;<br &#47;>    memset(prev,-1,sizeof(prev));<br &#47;>    for (int i = 0; i < R; i++) {<br &#47;>        for (int j = 0; j <= i; j++) {<br &#47;>            file>>prev[0][i][j];<br &#47;>        }<br &#47;>    }<br &#47;>}<br &#47;>int max(int i,int j){<br &#47;>    if(i==R-1)return prev[1][i][j]=prev[0][i][j];<br &#47;>    else if(-1!=prev[1][i][j])return prev[1][i][j];<br &#47;>    else{<br &#47;>        if(max(i+1,j)>max(i+1,j+1))<br &#47;>            return prev[1][i][j]=prev[0][i][j]+max(i+1,j);<br &#47;>        else return prev[1][i][j]=prev[0][i][j]+max(i+1,j+1);<br &#47;>    }<br &#47;>}<br &#47;>int main(int argc, const char *argv[])<br &#47;>{<br &#47;>    input();<br &#47;>    ofstream file("numtri.out");<br &#47;>    file<<max(0,0)<<endl;<br &#47;>    return 0;<br &#47;>}<br &#47;><br &#47;><&#47;pre><br &#47;><&#47;div></p>]]></content><author><name>{&quot;display_name&quot;=&gt;&quot;hippo&quot;, &quot;login&quot;=&gt;&quot;admin&quot;, &quot;email&quot;=&gt;nil, &quot;url&quot;=&gt;&quot;https://jaceho.github.io&quot;}</name></author><category term="usaco" /><category term="usaco" /><category term="algorithms" /><summary type="html"><![CDATA[&nbsp;&nbsp; 最简单的动态规划，但有一点得注意，用记录数组记录和时要防止其和与初始值相同。 Number Triangles Consider the number triangle shown below. Write a program that calculates the highest sum of numbers that can be passed on a route that starts at the top and ends somewhere on the base. Each step can go either diagonally down to the left or diagonally down to the right.]]></summary></entry><entry><title type="html">mother’s milk AC</title><link href="https://jaceho.github.io/motherampamp39s_milk_ac/" rel="alternate" type="text/html" title="mother’s milk AC" /><published>2012-12-28T12:13:12+00:00</published><updated>2012-12-28T12:13:12+00:00</updated><id>https://jaceho.github.io/motherampamp39s_milk_ac</id><content type="html" xml:base="https://jaceho.github.io/motherampamp39s_milk_ac/"><![CDATA[<div id="BlogArticleDetail" style="font-size: 14px;"> <font size="2"><b>总算用<font size="2">上学到的数据结构了，广搜AC，这做到1.5<font size="2">虽然有点<&#47;font>慢，但不能放弃啊。<&#47;font><&#47;b><&#47;font><br &#47;>
<p> Farmer John has three milking buckets of capacity A, B, and C liters. Each of the numbers A, B, and C is an integer from 1 through 20, inclusive. Initially, buckets A and B are empty while bucket C is full of milk. Sometimes, FJ pours milk from one bucket to another until the second bucket is filled or the first bucket is empty. Once begun, a pour must be completed, of course. Being thrifty, no milk may be tossed out.  <&#47;p><a id="more"></a><a id="more-22"></a>
<p> Write a program to help FJ determine what amounts of milk he can leave in bucket C when he begins with three buckets as above, pours milk among the buckets for a while, and then notes that bucket A is empty.  <&#47;p><br />
<h3>PROGRAM NAME: milk3<&#47;h3><br />
<h3>INPUT FORMAT<&#47;h3>
<p>A single line with the three integers A, B, and C.  <&#47;p><br />
<h3>SAMPLE INPUT (file milk3.in) <&#47;h3>
<pre>8 9 10 <&#47;pre><br />
<h3>OUTPUT FORMAT<&#47;h3>
<p>A single line with a sorted list of all the possible amounts of milk that can be in bucket C when bucket A is empty.  <&#47;p><br />
<h3>SAMPLE OUTPUT (file milk3.out)<&#47;h3>
<pre>1 2 8 9 10 <&#47;pre><br />
<h3>SAMPLE INPUT (file milk3.in) <&#47;h3>
<pre>2 5 10 <&#47;pre><br />
<h3>SAMPLE OUTPUT (file milk3.out)<&#47;h3>
<pre>5 6 7 8 9 10 <br &#47;><br &#47;><!--more-->&#47;*<br &#47;>ID: hippo he<br &#47;>LANG: C++<br &#47;>TASK: milk3<br &#47;>*&#47;<br &#47;>#include<iostream><br &#47;>#include<fstream><br &#47;>#include<queue><br &#47;>#include<vector><br &#47;>#include<algorithm><br &#47;>using  namespace std;<br &#47;>typedef struct Tripple{<br &#47;>    short int container[3];<br &#47;>}Tripple;<br &#47;>short int Max[3];<br &#47;>void input()<br &#47;>{<br &#47;>    ifstream in("milk3.in");<br &#47;>    in>>Max[0]>>Max[1]>>Max[2];<br &#47;>    in.close();<br &#47;>}<br &#47;>bool arriGoal(Tripple t){<br &#47;>    if(t.container[0]==0)return true;<br &#47;>    return false;<br &#47;>}<br &#47;>bool exchanged(Tripple &amp;u,int i,int j){<br &#47;>    if(i==j||u.container[i]==0||u.container[j]==Max[j])return false;<br &#47;>    if(u.container[i]-(Max[j]-u.container[j])>0){<br &#47;>        u.container[i]-=Max[j]-u.container[j];<br &#47;>        u.container[j]=Max[j];<br &#47;>    }<br &#47;>    else{<br &#47;>        u.container[j]+=u.container[i];<br &#47;>        u.container[i]=0;<br &#47;>    }<br &#47;>    return true;<br &#47;>}<br &#47;>void dfs(bool (*visited)[20][20],vector<int> &amp; res){<br &#47;>    queue<Tripple> tr;<br &#47;>    Tripple init;<br &#47;>    init.container[0]=0;<br &#47;>    init.container[1]=0;<br &#47;>    init.container[2]=Max[2];<br &#47;>    tr.push(init);<br &#47;>    if(arriGoal(init))res.push_back(init.container[2]);<br &#47;>    visited[0][0][Max[2]]=1;<br &#47;><br &#47;>    while(!tr.empty()){<br &#47;>        Tripple tmp=tr.front();<br &#47;>        Tripple save=tmp;<br &#47;>        tr.pop();<br &#47;><br &#47;>        for (int i = 0; i < 3; i++) {<br &#47;>            for (int j = 0; j < 3; j++) {<br &#47;>                if(exchanged(tmp,i,j)&amp;&amp;!visited[tmp.container[0]][tmp.container[1]][tmp.container[2]]){<br &#47;>                    tr.push(tmp);<br &#47;>                    visited[tmp.container[0]][tmp.container[1]][tmp.container[2]]=1;<br &#47;>                    if(arriGoal(tmp))res.push_back(tmp.container[2]);<br &#47;>                }<br &#47;>                tmp=save;<br &#47;>            }<br &#47;>        }<br &#47;>    }<br &#47;>}<br &#47;>void output(vector<int> &amp;res)<br &#47;>{<br &#47;>    ofstream file("milk3.out");<br &#47;>    vector<int>::iterator it=res.begin();<br &#47;>    for (it = res.begin(); it!=res.end();it++)<br &#47;>        if(it==res.begin())file<<*it;<br &#47;>        else file<<" "<<*it;<br &#47;><br &#47;>    file<<endl;<br &#47;>    file.close();<br &#47;>}<br &#47;>int main(int argc, char const* argv[])<br &#47;>{<br &#47;>    bool visited[20][20][20];<br &#47;>    vector<int> res;<br &#47;>    input();<br &#47;>    dfs(visited,res);<br &#47;>    sort(res.begin(),res.end());<br &#47;>    res.erase(unique(res.begin(),res.end()),res.end());<br &#47;>    output(res);<br &#47;>    return 0;<br &#47;>}<br &#47;><br &#47;><&#47;pre><&#47;div></p>]]></content><author><name>{&quot;display_name&quot;=&gt;&quot;hippo&quot;, &quot;login&quot;=&gt;&quot;admin&quot;, &quot;email&quot;=&gt;nil, &quot;url&quot;=&gt;&quot;https://jaceho.github.io&quot;}</name></author><category term="usaco" /><category term="usaco" /><category term="algorithms" /><category term="milk" /><category term="mother" /><category term="breadth first search" /><summary type="html"><![CDATA[总算用上学到的数据结构了，广搜AC，这做到1.5虽然有点慢，但不能放弃啊。 Farmer John has three milking buckets of capacity A, B, and C liters. Each of the numbers A, B, and C is an integer from 1 through 20, inclusive. Initially, buckets A and B are empty while bucket C is full of milk. Sometimes, FJ pours milk from one bucket to another until the second bucket is filled or the first bucket is empty. Once begun, a pour must be completed, of course. Being thrifty, no milk may be tossed out.]]></summary></entry></feed>